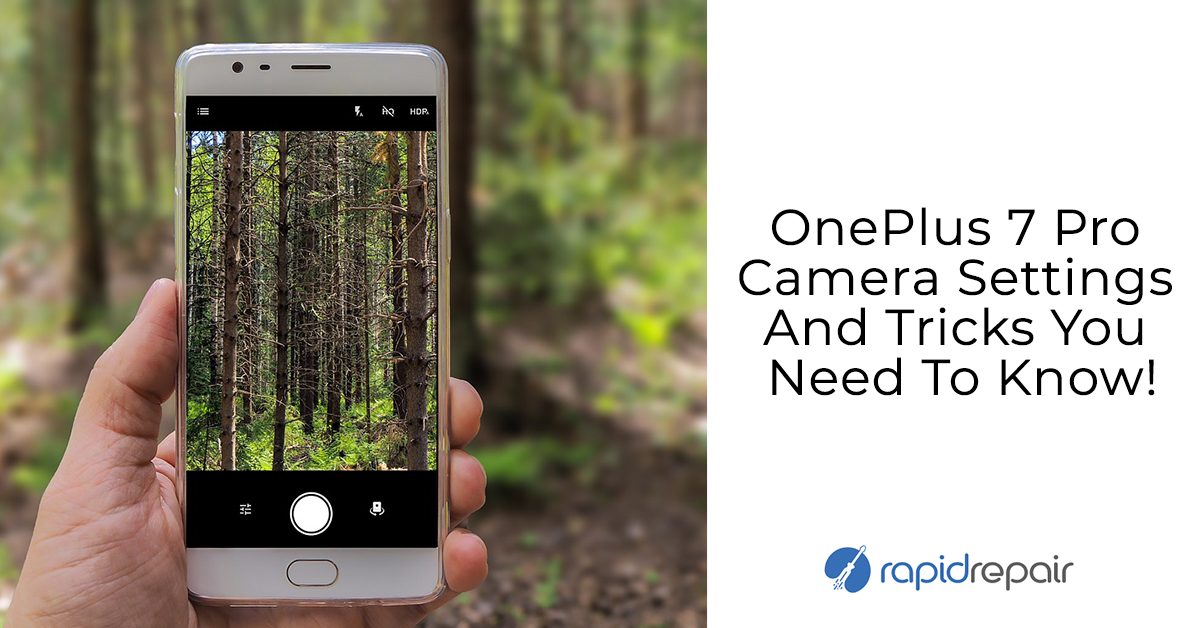
The iPhones and the Pixels sure pack in some punch when it comes to great photos, but trust us when we say that it’s possible to click awesome stuff even with a more standard phone like the OnePlus 7 Pro. Boasting top-of-the-line specs along with stunning cameras, which includes the 16 MP selfie shooter and 48MP + 8MP + 16MP triple rear-camera, the OnePlus 7 Pro has got what it takes to create really good photos. If you are serious about your mobile photographs, then make sure you do more than point at something and just press the click button. Here are some great tricks and tips that can produce some jaw-dropping photographs.
10 tricks to click fabulous photos with your OnePlus 7 Pro
#1 Customization of the OnePlus 7 Pro Camera Interface
It is easy to customize the shooting mode in your OnePlus 7 Pro and have your favourite modes next to each other. If you are someone who is more into the slow-motion mode over the pro mode, you can juggle it now.
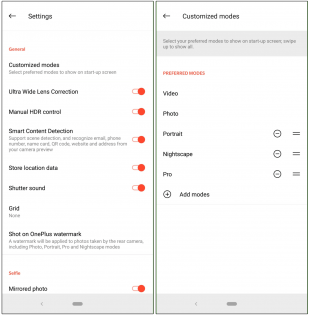
The steps are rather simple – pull up the preferred-mode screen and tap on Settings. Then tap on customized modes and go about your modifications. However, the video and photo mode cannot be moved or removed, quite obviously.
#2 Select the 48MP mode for highly detailed pictures
Want to click a printable family portrait with your phone? This is where the 48MP shooter comes in handy. By default, the OnePlus 7 Pro produces 12MP images even though the sensor is 48MP. No denying, the pictures come out really good.
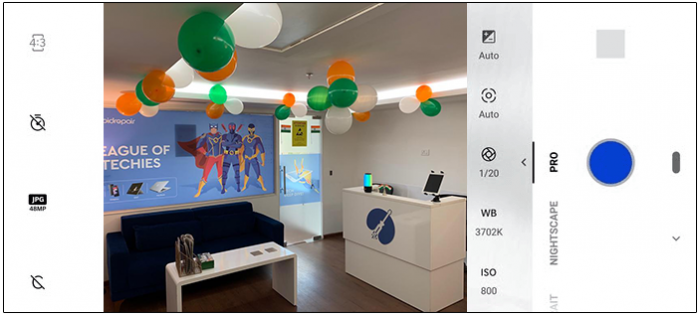
To activate the 48MP sensor, click on the pro mode and tap on the tiny JPEG 48 icon and you are good to go! This gives you highly detailed photos that you can even print without compromising on quality. Just have a look at our office photo below taken with a OnePlus 7 Pro.
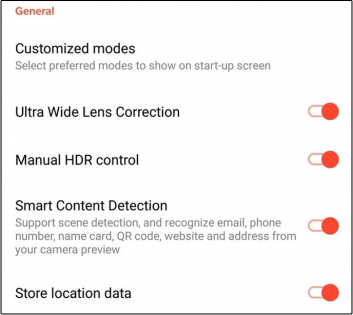
#3 Leverage ultra-wide lens correction
The ultra-wide mode in the recent cameras is a rage and widely used, though they come with a major flaw of ending up with a slight fisheye distortion. In some phones, the distortion needs to be manually removed. However, with the OnePlus 7 Pro, the issue is taken care of by the phone itself. In the settings menu, just enable the Ultra Wide Lens Correction option.
Editor’s Note: For the uninitiated, the ultra-wide-angle lens captures images with an extremely wide angle of view. The ability to fit much of the foreground and the surrounding elements makes it a preferred choice for architecture and landscape photography. So, the next time you wish to amp your landscape photography or want to capture architecture shots like a pro, don’t forget to bring it into action.
#4 Get Smart with your phone photography
The Google Lens Integration on the camera app of OnePlus 7 range is a boon for smartphone users, especially OnePlus 7 Pro. It eases the process of recognizing common objects like bar codes, email address, phone number, among others.
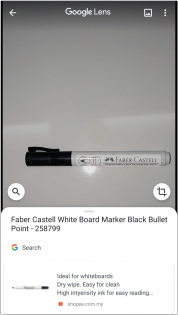
To activate the lens, one has to long-press on the screen of the camera interface. The Smart Content Detection option gives the camera a good boost. For instance, if the camera detects a breath-taking landscape, it will notify you to use the wide-angle mode instead of the regular auto mode.
Just point your camera towards the subject and it will prompt! Enable the Smart Content Detection option by heading over to settings and toggling the switch on.
#5 Make way for beautiful and crisp night shots
With the Nightscape 2.0, OnePlus 7 Pro’s new night mode, one can get beautiful night shots. It uses an inbuilt long exposure photography tactic for low light conditions, which can help capture crisp photos with less noise and the right amount of light.
While OnePlus Pro’s night mode is pretty good in terms of capturing impressive shots at night or low-lit environments, there is one thing you must keep in mind. And that is camera stability. If you fail to keep the camera steady, you won’t get the desired result. Now, if you are wondering what might be the right way to prevent the smartphone from shaking, let us tell you that a tripod could be a great asset for snapping pro-looking night shots using your OnePlus 7 Pro.
Editor’s Note: You can get a super handy tripod from Amazon at around ₹500-1000. Among a plethora of options, there are three tripods that have managed to catch our attention. Hoteon (₹510), Powerpak LS (₹800), and Mobilife (₹1000). They are well-built and let you hold the smartphone in multiple orientations, perfect for the times when you want to have the enhanced flexibility to shoot pro-grade photos or videos. Oh yes, they also come equipped with a nifty remote to let you snap photos without having to deal with the last-minute shake!
#6 Get Rid of the Mirrored Selfie
If you aren’t a fan of mirrored selfies and often worry about the OnePlus 7 Pro’s camera snapping it by default, you aren’t alone. Well, the good thing is, you can turn it off/on at your will. Simply head to the Camera Settings on your OnePlus 7 Pro and disable the toggle right next to the Mirrored photo option.
#7 Get DSLR quality portrait shots
The 3x telephoto camera is a cool way to zoom in on your subject. However, using the required minimum distance is the only way you would get a clear portrait shot. The camera interface has an active indicator to alert you if you are too close or far from your subject. If the depth icon is green, you are good to go with your perfect shot. If it shows grey, it indicates a need for readjustment.
#8 Save RAW images from your phone!
How professional could the OnePlus 7 Pro camera get? RAW images by format are more flexible to edit than the standard JPEG images. From individual colour corrections to lighting adjustments, RAW images are known to be a favourite among avid photographers.
The RAW mode too, like the 48MP shoot mode, cannot be found simply in the settings. To activate, open the PRO mode and tap on the tiny JPEG icon and select RAW.
9. Zoom with Precision
OnePlus 7 Pro has made it pretty simple to zoom. If you are still using the age-old pinch gesture to zoom, be sure to master this nifty hack as it can play a key role in speeding up your mobile photography.
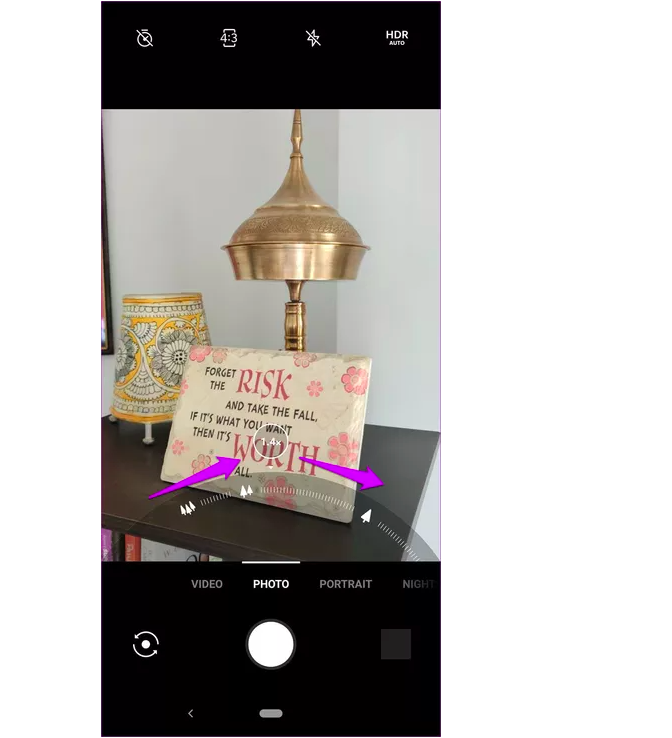
Image credit: GuidingTech
While you are inside the camera, touch one of the three icons gently on the camera interface and then slide your finger to the right slowly. Super handy, isn’t it? Now that you know how this hidden trick works, make the most of it to zoom like a pro.
Wish to Elevate Your Photography? Try Out the Pro Photo/Video Editors!
This is just an extra suggestion. If you have a liking for shooting photos and video, chances are pretty high that you would be sharing them on social networking platforms. Though most social networking apps come with a handful of built-in tools to let you enhance your shots, they are quite limited.
So, if you don’t want those restrictions to prevent your images/clips from garnering a ton of likes, we would recommend photo/video editors. While Snapseed and Adobe Lightroom are the best photo editors, FilmoraGo and Funimate are among the top-notch video editors for Android. Not to mention, these apps are available for free, so that you can get the most out of them without having to break your bank!
Bottom Line
For those who cannot fork out the cash for the biggie phones, OnePlus 7 Pro camera has a lot to offer. Overall image quality is super, and so there is already a lot of potential for great photography. Add to that our list of 10 great suggestions, and you can click pictures that are as good as DSLR photographs.
It’s worth pointing out that we have also covered a handful of common tips and tricks for OnePlus 7 Pro that can help you to not only get the most out of your flagship smartphone, but also enable you to fix some oft-repeated annoyances.
Though OnePlus 7 Pro has received high praise for fast and snappy performance, it is after all an electronic device and may run into issues for some reason or the other. This is where Rapid Repair – India’s most preferred OnePlus repair brand – comes into the picture.
Meanwhile, do not forget to share with us your favourite clicks!
 Image credit: Apple