What’s Screen Mirroring iPhone and How Does it Work?

If you’ve ever wondered how screen mirroring in iPhone works and how you can do screen mirroring from iPhone to a smart TV, then you are at the right place. Read on.

What is Screen Mirroring in iPhone

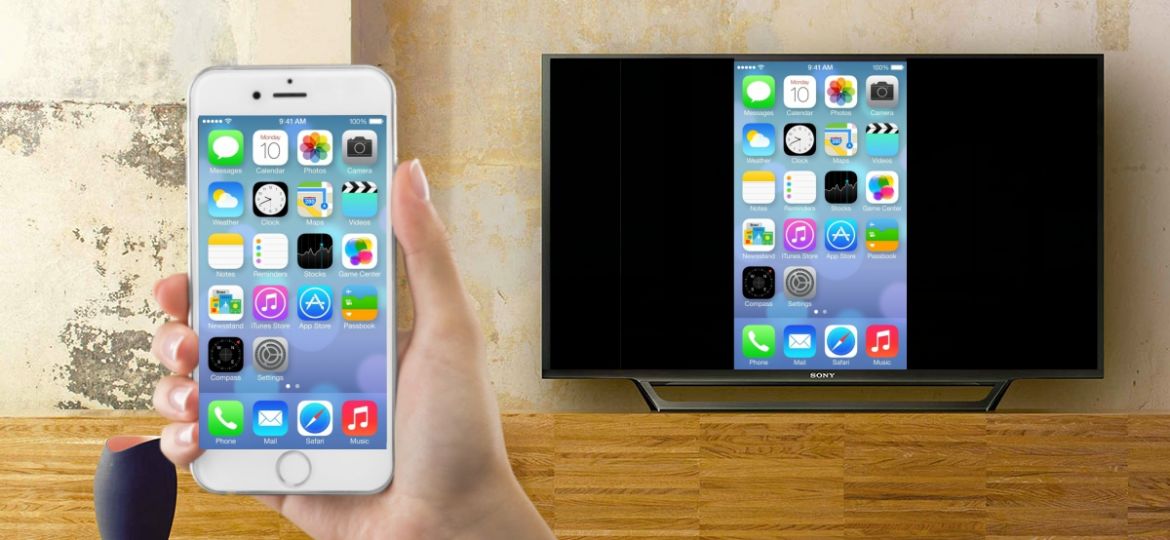
Screen mirroring is the process when you replicate your iPhone screen onto a Mac, Apple TV or Smart TV. In screen mirroring, whatever you are playing or doing on your smartphone is displayed on the TV over a Wi-Fi connection.


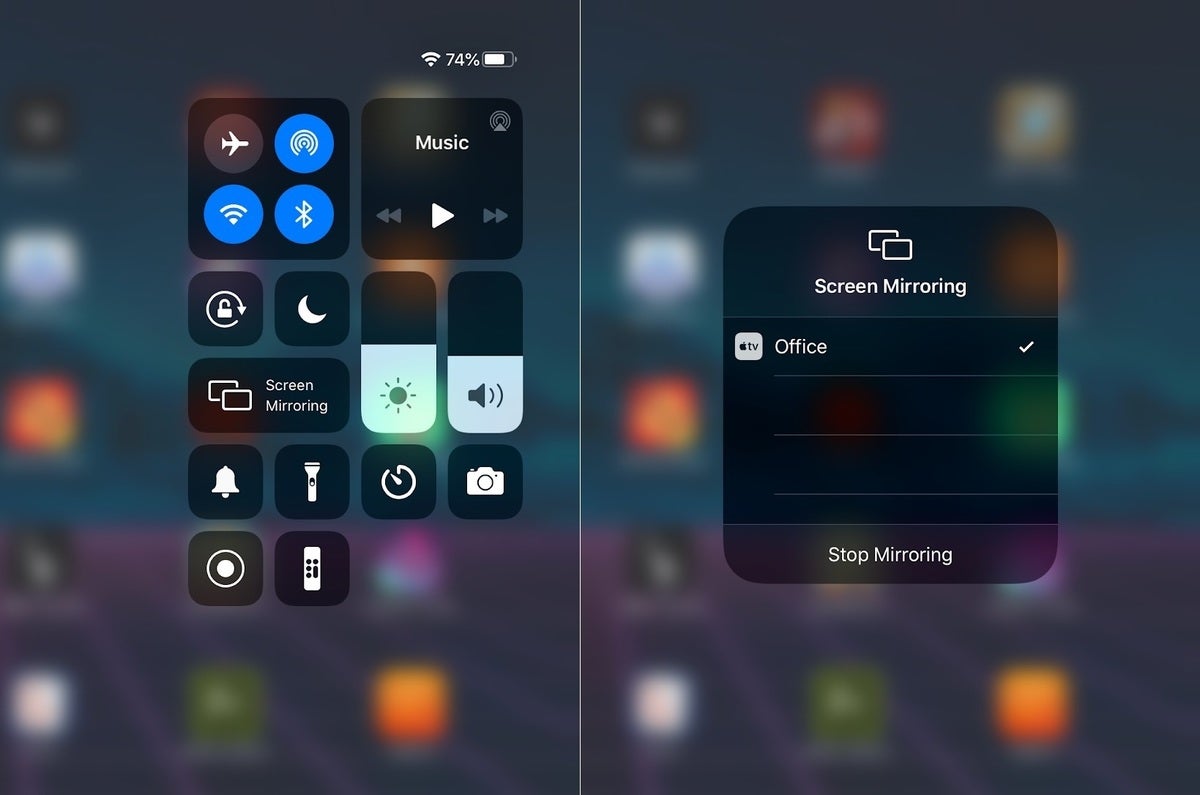
(Image Credit – Images.idgesg.net)

There is a difference between mirroring and AirPlay. While mirroring creates a duplicate of what you are doing on the iPhone, AirPlay lets you share any image, audio, or video being played on your iPhone to a TV without any loss in quality.


How to Screen Mirror Your iPhone to a TV or Mac

Follow these steps for screen mirroring iPhone to a TV or Mac:

Step 1: Connect your iPhone to the same Wi-Fi network that your Mac, Apple TV or an AirPlay 2 Compatible smart TV is connected with.

Step 2: Open the control centre on your iPhone.

  • For iPhone 8 or earlier, swipe up from the bottom of the screen.
  • For iPhone X and later, swipe down from the upper right of the screen.

Step 3: Tap on the Screen Mirroring icon.

Step 4: Select your device—Mac, Apple TV or smart TV—as shown on the list.

Step 5: Enter the passcode if it appears on your iPhone. Your iPhone screen will now be mirrored on the big screen.

Step 6: Open the Control Center again and then tap on Screen Mirroring > Stop Mirroring to stop the screen mirroring from your iPhone. If you are using an Apple TV, pressing the menu button on the remote will also stop mirroring.


(Image Credit: iStreamer)

How to AirPlay a Video from your iPhone to a TV

Step 1: Make sure that your Apple TV or AirPlay 2 compatible smart TV is connected to the same Wi-Fi network as your iPhone.

Step 2: Play any video or audio you want to stream.

Step 3: Tap the AirPlay icon. In some apps, you would have to tap on Share first to access the AirPlay option.

Step 4: From the list that pops up, choose your TV.

Step 5: To stop streaming, simply tap the AirPlay icon in the app you are streaming from.

Read – ‘No Service’ on iPhone? Try These Quick Hacks

How to Connect My iPhone to a non Smart TV

While screen mirroring is an easy and fast way to play content from your iPhone on a bigger screen, not everyone has an Apple TV. If you want to screen mirror your iPhone to a standard non-smart TV, there are several ways of doing that.

Mirror iPhone using Apple’s Digital AV Adapter

Apple’s Digital AV Adapter is lightning to HDMI and Type C converter that allows you to connect your iPhone to any TV with an HDMI port. You just need an HDMI cable to connect both the devices and you can then easily see content on your iPhone in 1080p picture quality and sound on a much bigger screen.

The only drawback of this method is that you’d need to keep your phone connected with the adapter at all times.


Mirror iPhone Using Google Chromecast

Chromecast is a streaming device that can turn any TV into a smart TV capable of connecting to any phone or tablet. It is a small dongle like device that connects to your HDMI port and lets you do screen mirroring of iPhone to any TV granted you are both connected to the same Wi-Fi network as well. Apart from the device, you’ll also need to download the Chromecast app on your iPhone.

Mirror iPhone Using Third-party Apps

There are several third-party apps such as LetsView and AirBeamTV that you can use for screen mirroring your iPhone to a smart TV. While these apps won’t need you to buy any additional hardware, you might need to pay to use the apps. All you have to do is connect your iPhone and smart TV to the same Wi-Fi network, download and open the apps on both devices, follow the on-screen instructions and you’re done.

There are a lot of perks of doing screen mirroring in iPhone. With the help of this guide, you can screen mirror your iPhone to PC or screen mirror iPhone to a Smart TV without any difficulty.

OnePlus 8 Pro Display Issues and Their Possible Solutions

OnePlus made headlines around the world with its flagship-esque devices that were available in affordable prices. While a lot of people still put OnePlus in the “flagship killer” category, the company forayed into the high-end category truly with the launch of their OnePlus 8 Pro. It was a significant bump over OnePlus 8 and sported a refreshing AMOLED screen with a 120Hz refresh rate.

The phone placed OnePlus along the likes of Samsung and Apple when it comes to smartphones in the premium end of the spectrum. However, just like any other phone, OnePlus 8 Pro has its fair share of bugs and issues as well. With the screen being the highlight of the device, OnePlus 8 Pro display issues plagues users the most. Here, we’ve compiled a list of some of the most common OnePlus 8 Pro display problems users face and some tips to solve them as well.

Dark Bar Across Selfie Camera

One of the major OnePlus 8 Pro display issues that many users have complained about is a dark bar across the selfie camera. It mostly crops up in less bright scenarios, especially when dealing with grey backgrounds.

Image credit: OnePlus Community

The presence of a dark bar across the selfie camera has raised concerns about the serious screen damage. Some wild reports have also suggested that the issue could be due to the defective front camera.

Screen Retention/Burn-In/Ghosting

There is no doubt that the OLED (Organic Light-Emitting Diode) display is more power-efficient and provides an immersive viewing experience. That is the reason why it’s got such a huge demand. However, it is not without flaws.

The OLED display in OnePlus 8 Pro is unable to hold the burn-in issue at bay. For those uninitiated, it is image retention which is caused by the uneven degradation of the pixels.

Though you shouldn’t worry about the ghosting problem as it’s normal behavior, make sure to avoid leaving the screen on a static image for long periods of time to prevent this issue. When not in use, be sure to lock the phone.

Green/Purple Tint

The green tint issue in OnePlus 8 Pro can be noticed in lower brightness, has also been reported by several users. Whenever a user tries to invert colors, the display shows weird looking green/purple tints on the screen. It puts the whole purpose of inverting colors on the backburner.

Image credit: 91Mobiles

User who have faced the OnePlus 8 Pro green tint issue have reported that turning off DC Dimming temporarily solves the problem. For those unfamiliar with it, DC Dimming is designed to neutralize the display and also decreases the voltage being delivered to the pixels.

To turn it off, head into Settings> Utilities > OnePlus Laboratory. Then, turn off the toggle for DC Dimming.

Image credit: Smartprix

Black Crush

Last but not the least, black crush is yet another OnePlus 8 Pro display issue that is widely prevalent on OnePlus 8 Pro devices. It is said to be triggered during darker scenes when watching videos or scrolling through dark backgrounds. It is so intrusive at times that it hurts the whole media watching experience.

Image credit: OnePlus Community

Read Also – OnePlus 7T: Common Problems and How You Can Fix Them

Touchscreen Lag

Many users have experienced that when the refresh rate and resolution of their OnePlus 8 Pro is kept at 120Hz and Quad HD, there is a noticeable lag in the touchscreen and ghost touches as well. This phenomenon becomes more prevalent while using the keyboard.

Reducing the display resolution is a quick fix to solve this issue but isn’t ideal as it prevents users from getting the most out of the superb display. Some users have noticed that disabling the “Three-finger screenshot” does the trick as well.

What Are the Solutions to Troubleshoot OnePlus 8 Pro Display Problems?

Though the above-mentioned issues might give you an indication that its always the screen which is defective, we won’t completely rule out the possibility of a software glitch.

Update Software

As software updates often come with a host of performance improvements and bug fixes, the OnePlus 8 Pro display issues can be fixed with the latest update and we would recommend you update your device first.

To download and install the latest version of OxygenOS on your OnePlus 8 Pro, head over to Settings > System > System Updates. Now, download and install the latest version of OxygenOS on your device as usual.

Factory Reset

Keep a back up of data and important files before resetting your device.

If your phone is on, you can go to Settings > System > Reset > Erase all data to factory reset the phone.

If your phone is off, press and hold the power button and volume down key together until the phone vibrates. Use the volume keys to navigate up and down in the Android Recovery screen and the power button to select something. Go to the “Wipe data and cache” option and choose “Erase everything” to factory reset the device.

Clean the Screen

While it’s not a solution per se, we would also recommend you to clean the screen, ensuring there is no pileup of smudge. Believe it or not, dust tends to sneak into ports, speakers, and other areas like the front camera, and microphones with ease. So, be sure it’s not creating problems for the display.

Even though most screen protectors claim to be dust resistant, not all of them are able to do what they advertise. Thus, if you find your screen guard incapable, replace it with a better one.

Contact the Repair Centre If Software Update Fails to Resolve the Display Issues on Your OnePlus 8 Pro

In some cases, the OnePlus 8 Pro display issue can’t be solved with software updates or factory resetting the device and it could be that the screen of your OnePlus 8 Pro is defective. In such cases, you might need to get the screen repaired or replaced by a trusted OnePlus smartphone repair centre near you.

Rapid Repair is one of the most trusted repair centres for OnePlus 8 Pro and other OnePlus devices. Our team of experienced super-techies are capable of fixing anything at a reasonable cost and make it look like new. We use genuine parts only and you can be sure of our service as we provide a guarantee as well. If you are facing any issues with your OnePlus 8 Pro, display related or otherwise, contact us and other delivery partner will be at your doorstep to pick up the device and return it back to you once it’s fixed.

7 Pro Tips to Fix MacBook Overheating Issue

When Apple released their fan-less MacBook Air lineup capable of achieving such high performance without making any noise, it turned heads across the world. With the introduction of the new M1 chips. Apple again made a statement. While an 8-core CPU and 8-core GPU improves the laptop’s performance to a great extent, users are still facing heating issues in the MacBooks.

And it is not just limited to older laptops that have been in use for years, even the newly released M1 Macbook Air and Pro get overheated when users juggle between apps, open a lot of tabs in Google Chrome, or use the laptop without proper ventilation. If you’re facing MacBook Air or Pro heating issues, here are some helpful tips and tricks you can follow to fix the Mac overheating problem on your own.

Use Activity Monitor to Find Out What’s Eating into More Battery

Activity Monitor is incredibly helpful in finding out the apps that consume more resources like CPU. So, the first thing you should do is to open Activity Monitor (Finder > Applications folder > Utilities) and then take a close look at how the resources are being used on your MacBook.

If you find some apps using more resources, delete them. If you don’t want to get rid of them, use their alternatives that consume fewer resources.

Once you have taken control of the resource-hogging apps/services, your MacBook may stop overheating straight away.

Remove a Bulky Case to Improve Heat Dissipation (also: Ensure that the Chargers aren’t Damaged or Uncertified)

Some bulky cases do not allow the notebook to dissipate heat freely, which triggers the overheating issue. Therefore, make sure the case has a neat venting designed for improved heat dissipation.

Just in case the cover doesn’t have a vented design, replace it with a lightweight and slim design. Besides, ensure that the chargers are certified as uncertified chargers tend to cause the MacBook to overheat.

Reset SMC

Resetting SMC (system management controller) has long been a reliable hack for taking control of the thermal management of the MacBook. When the fan of the notebook runs high, it comes in handy in cooling it down.

Simply click on the Apple menu and select Shut Down. After your notebook is turned off, hold down the “shift+option+control” keys on the keyboard and the power button simultaneously.

Keep holding them for 10 seconds and then release them. Next, press the power button to turn on the notebook. Once your laptop has restarted, use it for some time to see if the problem has gone.

Keep the Vents Clean

While it might not be so obvious, but your MacBook does have a ventilation area near the screen hinge. This is from where your MacBook expels heat and it is important that you keep this area clean and free of any dirt, dust, or debris buildup. You can use compressed air to blow on the vents and make sure that it is clean for heat to pass through.

Clean Up Your Mac

Overheating issues also crop up due to cluttered storage. If you haven’t wiped out unnecessary files for a long time, chances are high that they may have piled up to not only capture plenty of storage but also reducing the speed of the device.

When a MacBook becomes sluggish, it impacts the overall performance and even triggers unexpected battery draining. As a result, the notebook becomes hot randomly – at times so hot that you cannot even Hold it on your lap.

Enable Automatic Graphics Switching

Many MacBooks have both integrated and discreet graphics processor in their system. The discrete graphics processor is more powerful but requires a lot more resources and cause your MacBook Pro to heat up. By enabling the Automatic Graphics Switching option, the system will automatically detect which graphics card is needed for which task and will use integrated graphics for less power hungry tasks keeping the overheating issues in check.

You can go to System Preferences > Battery to enable the Automatic Graphics Switching option if it was not enabled by default.

Update Your MacBook

In some rare cases, the overheating issue crops up on Mac Due to software or OS related issues as well. In this scenario, the software update is always the right way to go.

Moreover, Apple almost always releases a new update with a long list of bug fixes and performance improvements. Therefore, it is always advisable to keep the Mac updated to the latest iteration of macOS.

To do so, head into System Preferences > Software Update and then install the latest version of macOS as usual.

Close Unnecessary Tabs

One of the biggest reasons for your MacBook Pro heating up is because you have kept a lot of tabs in your browser open. Internet browsers can put a lot of strain on your laptop’s CPU and forces the fans to work harder to keep the temperature around the CPU down. This causes the MacBook Pro heating issue quite often.

While a lot of users prefer third-party browsers like Google Chrome, Firefox and more to surf the internet, Apple’s in-built browser Safari is is way more friendly for your system. It is less resource hungry and is optimized to prevent the MacBook heating issue.

Use Energy Saver Settings

Although you might have opened just one tab in Google Chrome and not working on any other app, you can hear the fan kick in out of nowhere and your MacBook Air starting to overheat. This is a common occurrence for a lot of people and they can’t figure out what’s causing this MacBook Air overheating issue.

This can be resolved by using your MacBook in the energy saving mode. In this mode, your system will stop any apps from running in the background if they aren’t necessary as they are reason behind the MacBook heating issue. Go to System Preferences and then click on Energy Saver to open the energy saver menu. Here you can switch on Automatic Graphics Switching, choose when to Turn Off the display to save power, whether to put the hard disk to sleep and more.

Check Your MacBook Fan

No luck as yet? Don’t worry as we still have a reliable way to nab the culprit.

When the cooling fan gets worn out or unable to function properly, the MacBook tends to become hot. So, now we are going to check whether or not the MacBook fan is functioning properly.

To get started, remove all the peripheral devices from your MacBook and then shut it down.

Next, turn on the laptop and hold the D key to start the Apple Hardware Test/ Apple Diagnostics.

Then, go ahead with the on-screen instructions to begin the test. Once the basic test is over, check the box to start the advanced test.

After the advanced test has finished, if you find the reference codes beginning with PPF, your MacBook’s cooling fan may be at fault. You will need to repair the cooling fan to get rid of the problem.

If Nothing Has Worked: Contact a Trusted MacBook Repair Centre

This is an extensive guide listing some of the ways users can solve the MacBook overheating problems on their own. However, it isn’t necessary that it will solve the MacBook heating issue for every user. If you are still facing a heating issue in your MacBook, you should contact a reliable MacBook repair centre around you.

If you don’t have a repair centre nearby, you can contact Rapid Repair. They have tied-up with delivery partners to pick-up the damaged device from your home, fix it, and deliver it to your doorstep. Their team of expert super-techies are experienced in working with MacBook Air and Pro overheating issues and will fix the device properly to make it work like new. To get your Mac overheating problem resolved, contact us now.

whatsapp logo