Apple iOS 17.3 – When & what to expect?

New Apple iOS 17.3 Update

If you are an Apple enthusiast the news of the upcoming version of iOS & iPadOS is nothing new to you. Just like you, millions of iPhone users around the world are waiting eagerly for the Apple iOS 17.3 release date. As always, speculations are roaming around in the air, not just about the probable release date, but also about the new features this latest iOS is going to bring to the table. Yet nothing is official as of now. All that is known is that soon there will be a time when you will get to update to iOS & iPadOS 17.3. But when?

Apple iOS 17.3 release date

It is expected that Apple will release these new generation iOS & iPadOS somewhere during the middle of January 2024. Some experts are speculating that the exact release date will be 16th January, but no one is willing to vouch for it. But it is confirmed news that currently the Beta testing is in progress. If the Christmas-New Year holiday season doesn’t slow down the test, the middle of January seems absolutely a perfect time for Apple to launch the new iPhone software. It is currently been released to developers and public beta testers. Once the test result is satisfactory, it will be launched.

Source: trainghiemso.vn

Now, let’s get to the new Apple iOS 17.3 features that we are excited about. Two upcoming features are expected to be useful to all iPhone users. The first one will add another strong layer of security to your iPhone and the second one will give you a chance to bond with your friends in the best way possible. Let’s get to them one by one.

Read – M3 Mac Mini 2024 – Release Date & Rumours

Apple iOS 17.3 – Stolen Device Protection

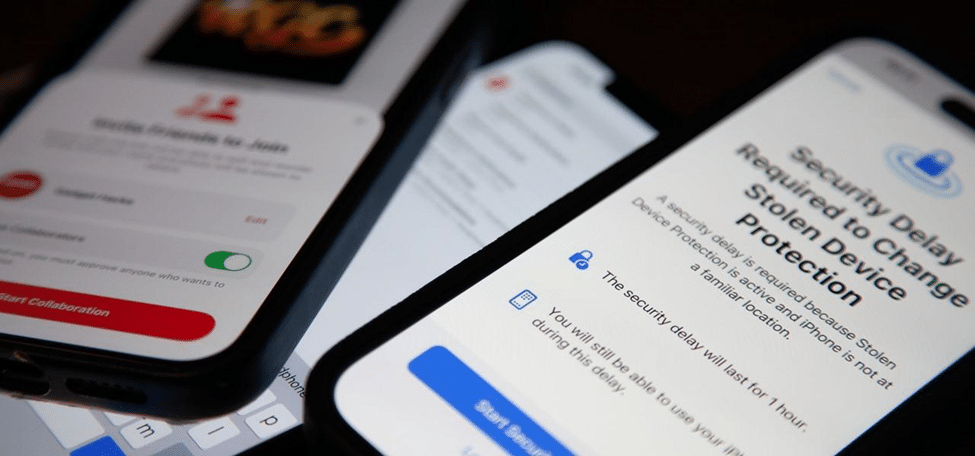
Source: iOS Gadget Hacks

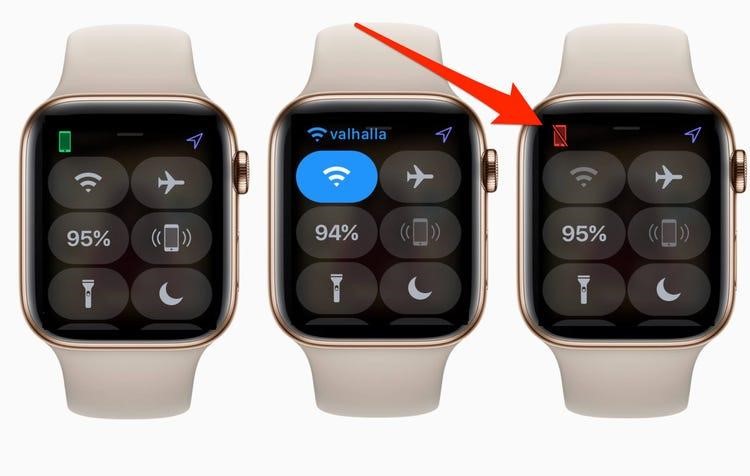
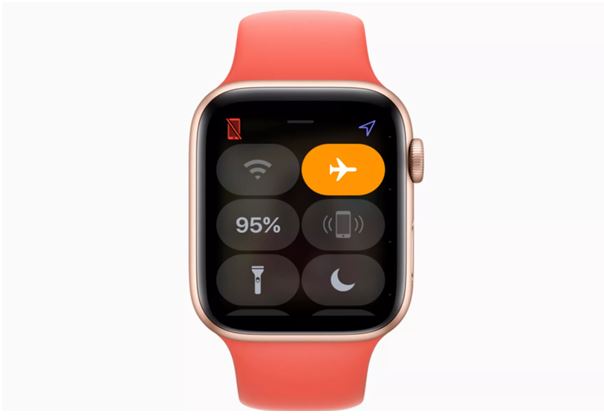
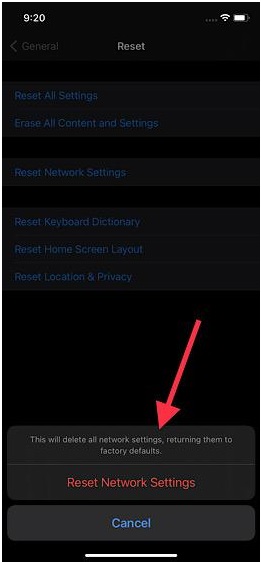
Imagine your iPhone got stolen! It’s possible, but the thief won’t be able to do much without the passcode. Now, imagine your iPhone got stolen and the thief knows your passcode. Well, this scenario can occur rarely but it’s very much possible indeed. In such a case, the thief can change your Apple ID password, change your iPhone passcode, and turn off Find My. What a catastrophe that will be! But not any more with iOS 17.3. In this new Stolen Device Protection feature, Face ID and Touch ID authentication will be strictly required to perform certain actions, like turning off Lost Mode. Additionally, there will be a one-hour security delay after Face ID and Touch ID authentication in implementing certain actions, if your iPhone is not in your home or work locations. Even after one hour, your iPhone will again ask for your Face ID and Touch ID authentication before implementing the action. Below, you will find a list of all those actions that might come under the protection of this new feature.

  • Turning off Lost Mode
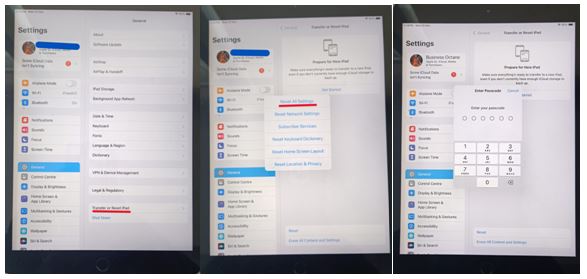
  • Using an iPhone to set up a new device
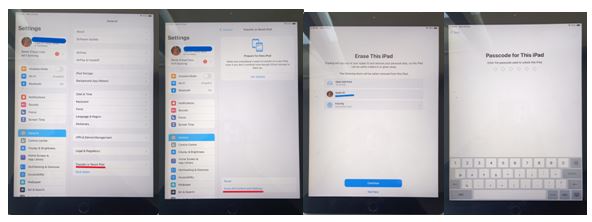
  • Erasing all content and settings
  • Access to passwords or passkeys saved in iCloud Keychain
  • To see an Apple Card’s virtual number or applying for a new Apple Card
  • To use Apple Cash and Apple Card Savings in the Wallet app
  • To use payment methods saved in Safari
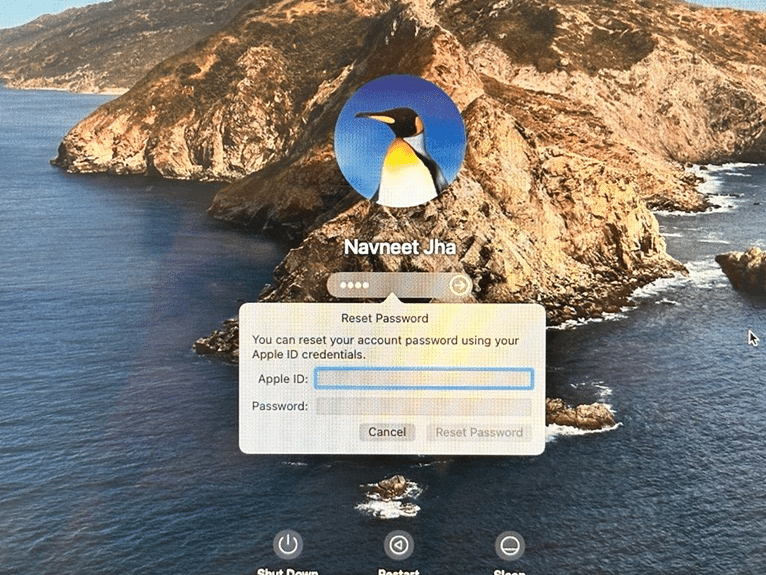
  • For changing the Apple ID password
  • To update important Apple ID security settings
  • For changing the iPhone passcode
  • For adding or removing Face ID or Touch ID
  • To turn off Find My
  • To turn off Stolen Device Protection

Now, this feature is not a mandatory update and you can simply keep the Stolen Device Protection mode off to avoid using this feature. To date, that’s all that is known about this upcoming security feature of iOS 17.3.

Apple iOS 17.3 – Collaborative playlists

If you love music and want to share that love with your close people, this iOS 17.3 feature is definitely going to excite you. Through this feature, multiple people can contribute to, edit, and react with emojis to shared playlists in Apple Music. This feature was announced at the Apple WWDC Event 2023. Isn’t this going to make Apple Music more interesting?

Source: iDrop News

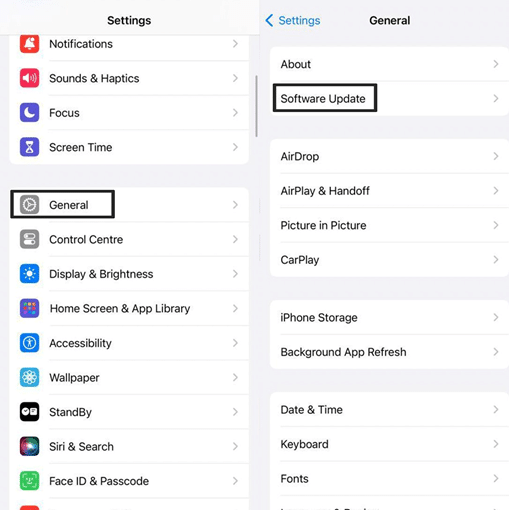
Any user using iPhone X or later models can get an iOS 17.3 update. Once it is launched, all you have to do is go to Settings > General > Software Update. Then tap Automatic Updates, and turn on Download iOS Updates. Once there, click on Install iOS Updates.

So that’s all you can know about iOS 17.3 now. For the rest, you have to wait until you update it on your iPhone.

Got issues with your iPhone, iPad, MacBook or any Apple device? Is a trustworthy iphone repair centre not in sight? Don’t worry, the experts can help you get a free pickup and drop service and provide a bright repair solution for all your Apple woes. Call today for Apple MacBook Pro battery replacement, screen replacement, and other top repair services.

Apple Watch Not Pairing: How to Fix It

Being an integral part of the Apple ecosystem, Apple Watch pairs seamlessly with the iPhone. Simply bring your iPhone close to the smartwatch, scan the QR code and you are good to go. That’s as straightforward as it can ever get!

However, at times the much-vaunted seamless pairing does seem to go haywire due to miscellaneous issues that tend to crop up out of nowhere. And when that happens, your Apple Watch seems to be completely left out of the Apple ecosystem. Fortunately, fixing the Apple Watch not pairing issue is not a big deal thanks to some reliable solutions. If that’s what you are after, this troubleshooting guide has got you fully covered.

Make Sure Settings aren’t Stopping Your Apple Watch from Being Paired 

To get started, be sure to check if settings are preventing the Apple Watch and iPhone from being paired with each other. To be more precise, there are a couple of settings that you need to check.

Image credit: Apple

Airplane Mode: When Airplane mode is enabled, it turns off radios which results in the stoppage of all the communication including the pairing. So, be sure it’s disabled on both the Apple Watch and iPhone.

Swipe up from the bottom of the watch face to access the control centre and then make sure to turn off Airplane mode button. On your iPhone, swipe down from the top right corner of the screen or swipe up from the bottom of the screen to access the control centre and then disable the Airplane mode.

Bluetooth: For the iPhone to communicate with Apple Watch, Bluetooth must be enabled. Therefore, ensure that it is enabled on your smartphone. Access control centre (swipe down from the top right corner of the screen or swipe up from the bottom to bring up control centre) and then make sure the tiny Bluetooth button is turned on.

Try out this preliminary solution and hopefully, the Apple Watch not connecting with iPhone issue will be fixed.

Check Your Apple Watch’s Connection

Another important thing to do at the beginning is to check the Apple Watch’s connection. watchOS makes it pretty straightforward to figure out whether or not your smartwatch is connected to the iPhone.

Image credit: Apple Watch

Simply swipe up from the bottom of the watch face to access the control centre. If you see a green iPhone icon, that means your Apple Watch is connected to your iPhone. However, if you see a red iPhone icon, that means your smartwatch is not connected to your iOS device.

Hard Reset Your iPhone and Apple Watch

If the above solutions have not resolved the Apple Watch not pairing with iPhone problem, go for the force restart aka hard reset. As it is widely considered as a super handy solution for fixing common Apple Watch/iPhone issues, we are going to give it a shot as well.

To force restart your Apple Watch:  Press and hold the Side button and Digital Crown at once until you see the Apple logo on the screen.

To hard reset your iPhone 8 or later: Press and quickly release the volume up button. After that, press and quickly release the volume down button. Then, hold down the side button until Apple logo pops up on the screen.

To hard reset iPhone 7/7 Plus: Press and hold the volume down button and the side button at once until Apple logo appears on the screen.

To hard reset iPhone 6s or earlier: Hold down the home button and power button at once until Apple logo shows up.

Reset your iPhone Network settings

If Apple Watch is still unable to pair with the iPhone, it would be apt to reset the network settings. The glitchy network often comes in the way of pairing. So, there is a high chance that resetting the network can do the trick.

Head over to Settings app > General > Reset > Reset Network Settings. Now, enter your passcode and then tap on Reset Network Settings again to confirm.

Update your iPhone And Apple Watch

If your Apple Watch is still not pairing with iPhone, go for the software update. It’s no secret that iOS is often embroiled in too many bugs that tend to create several problems. Therefore, it’s better to keep the iPhone updated to the latest version.

Navigate to the Settings app on your iPhone and choose General. Now, tap on Software Update. After that, download and install the latest version of iOS on your iPhone.

Besides, make sure to update your Apple Watch as well. With watchOS 6 or later, you can update software right from your Apple Watch. Go to Settings > General > Software Update and then download and install the update.

Last Resort: Erase Your Apple Watch and Repair It with Your iPhone

Based on our years of hands-on experience of fixing several Apple Watch issues at the Rapid Repair Apple Watch repair centre, we can tell that erasing the smartwatch and reconnecting it often sorts out even complex issues.

As Apple Watch automatically backs up the entire data at the time of unpairing, you should not worry about losing your data. Open Watch app on your iPhone > General > Reset. Now, tap on Erase Apple Watch content and settings.

Once your Apple Watch has been erased, repair it with your iPhone. Bring the device close to your watch and then follow the prompts to finish the pairing process. Along the way, you will get the option to back up your data.

Is iPad Screen Not Rotating? Try these methods to fix it

iPad, being such a wonderful gadget, has become a part of its users’ lives. It’s portable, can accomplish a lot of tasks, and is a saviour in many cases. But often, issues that might seem very minor to many can deeply affect its user experience. One such issue is the iPad screen not rotating. After all, who would prefer to watch a video shot in landscape mode in a portrait size? So it’s a genuine trouble when your iPad’s screen stops rotating. But in the world of tech, when there’s trouble, there’s troubleshooting. So without further delay let’s get into the details about what to do when the iPad screen is not rotating.

Source: Business Insider

How to rotate the iPad screen?

Let’s get into this step by step. Here you will get the easiest options first to make sure your screen rotates, followed by more complicated steps.

1.  Turn off the Rotation Lock Button – To do that, open the Control Centre by swiping down from the top right corner of the screen. Then tap on the Rotation Lock icon.

Source: Apple Support

2. Flip the iPad sideways – Open apps that work in landscape mode, like Message or Safari, and turn your iPad sideways to check if the screen is rotating.

Source: Apple Support

Read More – Know your iPad screen replacement Cost?

3. Assign rotation lock to the Side Switch – If you are using an older model of iPad, you will find a Side Switch above the volume up and down buttons. That can be used to control the rotation of your iPad screen. For that,

  • Go to Settings
  • Click on General
  • Tap on Use Side Switch To
  • Select Rotation Lock

Now use the side switch to unlock rotation and turn your iPad sideways to check if it is working.

4. Reset all settings – If none of the above options work, you might have to reset your settings. Because a certain error in the settings can prevent iPad screen rotation. To do that,

  • Open Settings
  • Tap on General
  • Click on Transfer or Reset iPad
  • Select Reset All Settings
  • Enter the passcode when prompted

5. Factory reset – Consider this as the last option that you can try to make sure your iPad screen is rotating. Make sure to take a backup of all your data before Factory Resetting your iPad. Then, follow these steps

  • Open Settings
  • Select General
  • Click on Transfer or Reset iPad
  • Select Erase All Content & Settings
  • Click on Continue
  • Enter the passcode when prompted

Your iPad will device Factory Reset and you can get back your iPad screen rotation.

Hopefully, any one of these options will help to unlock screen rotation. But if the issue persists, it is better to get your iPad treated by some expert Apple gadget repair service provider.

Got issues with your iPhone, iPad, MacBook or any Apple device? Is a trustworthy ipad repair centre not in sight? Don’t worry, the experts can help you get a free pickup and drop service and provide a bright repair solution for all your Apple woes. Call today for Apple MacBook Pro battery replacement, screen replacement, and other top repair services.

Can’t Log Into Your Mac? Here’s How to Fix It

Rumours are around that some Mac users are having a nightmare! They are trying to log in with the correct password, yet they are failing. Some even walk the extra mile of resetting passwords but in vain. You might be one of them, as you are here. So stop worrying now. Here you will get to know what to do when the password for Mac is not working.

Now, sometimes, there can be very simple reasons behind this issue. Below we are listing some.

Mistype – Make sure you are typing the right password. Crosscheck after typing every letter, number, or sign.

Caps Lock – Check if the Caps Lock key is off. Passwords are case-sensitive and an accidental click on the Caps Lock key can prevent you from typing the correct password.

Faulty Keyboard – Check if all the keys on your keyboard are working. Sometimes, a single faulty key of any letter, sign, or number in your password can be at the root of the entire issue. In such cases, it is better to take professional help.

With the belief that you have already taken care of the possibilities of any mistyping of the password, an accidentally active Caps Lock, or any fault in the keyboard, the basics are being skipped here. Here, you will get to know,

How to reset Macbook password?

After you turn on your MacBook, the login window appears. Once you have entered the wrong passwords three times in a row, you will get an option to ‘Restart and show password reset options’. Your MacBook will restart itself. Then you will get any three of these options,

Select a volume to recover – Select the volume that your Mac is currently starting up from. It is by default Macintosh HD.

Sign in with your Apple ID – Enter your Apple ID. Then enter its password. Enter the verification code sent to your other devices if asked. Click on Change Password. Enter new password information.

FileVault recovery key – If you are asked for a FireVault recovery key, enter the series of letters and numbers you received when you turned on FileVault and choose to create a recovery key.

Once you have finished one of the above processes, you will get an option to select a User to reset the password for. Select it and click on Next. Then reset your password and click on Next. Once the password is updated, restart your MacBook.

Read – MacBook Pro Dustgate Issue: A danger you must be aware of!

What to do if you can’t reset your MacBook login password?

In case the above steps are not working out and you still can’t log into Mac, the only option to reset your password will be by erasing your Mac. You can do that with the help of macOS Recovery. To do that, follow these steps.

  1. Press and release the power button while switching on your MacBook.
  2. After releasing the power button, press and hold Command (⌘)-R until you see an Apple logo or spinning globe.
  3. When you’re asked to select an admin user you know the password for, choose Erase Mac from the Recovery Assistant menu in the menu bar.
  4. From the Erase Mac window, click Erase Mac, then click Erase Mac to confirm.
  5. If your Mac restarts to a flashing question mark, press and hold the power button for a few seconds until your Mac turns off.
  6. Start up from macOS Recovery again, then reinstall macOS.

Source: Software Tested

This can help you with your MacBook Pro password reset. But in case the issue is in the hardware, like a faulty keyboard, then it is better to get it fixed by a trusted Apple gadget repair service provider like Rapid Repair. With free doorstep pick up and delivery of your gadget, rapid turnaround time, and lifetime warranty on Macbook repair service, they serve all over India.

App Store is not working? Tips to cheer it up

Source: Apple

Think about the largest shopping mall in your town. Imagine that’s the only mall. You can get anything there, and most of it is for free! You visit there often and pick up anything that will make your life easier. Nowadays you don’t even give the place a proper glance, because you are so habituated to it. Then one day suddenly, you see that you can’t enter it anymore! Scary, right? You might experience the virtual version of this fear if your iPhone cannot connect to the App Store.

Source: Reddit

It all starts with an error message that comes uninvitedly when you try to open the App Store. It reads loud and clearly, ‘Can’t Connect To The App Store’. And it leaves you confused. But in the tech wizarding world, there’s a spell for every tricky situation. And in this particular case, you will get many for one. But before going there, let’s take a look at the most common sources of this error.

  • Network Connectivity Issue
  • Outdated Operating System
  • Incorrect Time & Date Adjustment
  • Error in Apple’s Server

And below we have covered them all. So without wasting any further words, let’s get to the troubleshoots that you can try to get your App Store back.

Read – iPhone FaceTime not working ? Here’s how to fix

How to get App Store back on iPhone?

Check your connectivity – Okay! This is basic. But this is for those who are not reading this blog on the same iPhone. If you are using WiFi, then reconnect with the router. If it still doesn’t work, switch to mobile data and allow the App Store to use a data connection. To do that,

  • Open Settings
  • Tap Mobile Service
  • Scroll for the App Store
  • Toggle on the switch beside it

Then try reconnecting the App Store. If it works, voila! If it doesn’t, keep reading.

Update your iOS – The operating system software of your iPhone is like fashion, it keeps on evolving. All you need to do is to keep updating from time to time. And if you fail to do so, consequences can make you unable to download apps from the App Store. To check if you are using the latest version of iOS, go to Settings, click on General, and tap on Software Update. If there’s any available update, click on Update and Install. Once the iOS is updated, try opening the App Store.

Reset Time & Date – In earlier days, there was a habit of intentionally keeping the watch dial fifteen minutes ahead of the actual time to avoid delays. If something similar had been done to your iPhone, it may stop your App Store from working. So time travellers, please calm down! Go to Settings → General → Date & Time. Turn on the Set Automatically toggle. Then get back to the App Store.

Check Apple’s Server Status – Though the best minds are working with the best machines to keep the entire Apple server running, even then, they are just humans, and machines! Both have limitations. On rare occasions, errors appear on the App Store server. So before coming to the conclusion that your iPhone App Store is gone for good, check the status of the server. You can do so by visiting Apple’s System Status page.

So now you do know about how to get your app store back. Hopefully, any of the above tricks will work for your iPhone. And if nothing works out, then the disease can be something more serious. You better consult an expert to get your App Store back.

For any Apple gadget related issue, contact Rapid Repair. With free doorstep pickup and delivery of gadgets, lifetime warranty on repair services, and rapid turnaround time, Rapid Repair is the best iPhone Repair Provider for iPhone, iPad, MacBook, and Apple Watch. Call on 8130609004 to know more.

Read – Best Apple Watch Health Apps 2023: Just the ones you need

iPhone FaceTime not working ? Here’s how to fix

Imagine, you are chilling on a sea beach. The sun is about to set. You are in absolute bliss. Life seems perfect. Yet the breeze is making you miss someone. So, with a smile, you picked up your iPhone and tried to call that person on FaceTime. But alas, FaceTime is not working! What a tragedy. Well, well, even if all the drama here was sidelined, you still have to admit, it’s damn irritating when you see FaceTime not working. After all, any iPhone user who has used FaceTime can vouch for why this iOS-exclusive video-calling app offers the best features. No other similar app even comes closer. But, due to some bugs, there are times when FaceTime stops working.

Source: PhoneArena

But worry no more dear amigo. Here you will learn about all the tricks that might help you bring FaceTime back to business. So let’s try to understand this step by step.

FaceTime not working error message

Source: iDownloadBlog

There might come a time when you can see these kinds of error messages while trying to activate FaceTime.

  • Could not sign in. Please check your network connection.
  • Activation unsuccessful
  • Waiting for activation
  • An error occurred during the activation
  • Unable to contact the iMessage server. Try again.

In such cases, the first thing you must do is to confirm that the problem is not a basic one.

  • Check if your iPhone is connected to mobile data or WiFi. If not, connect it and try activating FaceTime again.
  • Check whether you are using the latest version of the app. You can go to the App Store and check the update section of the app to know if any update is required.
  • Make sure that you are using the latest version of iOS. Follow these steps to do it.
  1. Open the Settings App
  2. Tap On ‘General’
  3. Select ‘Software update’
  4. Tap on ‘Download and Install’ if a new software update is available

Now, if none of these work out, then you better give your iPhone FaceTime a more serious look. You will know how.

Read – iPhone Microphone Not Working – Quick Fix Options You Have

How to fix FaceTime not working on iPhone?

Below are listed a few simple yet effective tricks to use when FaceTime is not working.

Restart your iPhone: If you are not being able to access the FaceTime app, restart your iPhone, then try to activate it. It might work.

Enable FaceTime: Go to Settings, tap on FaceTime and check if the toggle for FaceTime is turned on.

Automatic Date & Time: Ensure that the inactivity of FaceTime is not caused by a wrong input of date & time in your iPhone. Go to the Setting App, open General, select Date & Time, then toggle on the Set Automatically icon.

Source: OSXDaily

Log in & log out: If the FaceTime app is not working properly, log out of it, then restart your iPhone, and try logging in again.

Check FaceTime’s server status: Sometimes some apps shut down their servers for a specific period due to maintenance or other reasons. So do check if you are the only one who is facing this issue, or if other people are also victims.

Source: groovyPost

So now that you have known everything about the issue of FaceTime not working, you can possibly fix it yourself. But, if still the issue persists, it is better to visit an expert.

Got issues with your iPhone, iPad, MacBook or any Apple device? Is a trustworthy iPhone repair centre not in sight? Don’t worry, the experts can help you get a free pickup and drop service and provide a bright solution for all your Apple woes. Call today for Apple iPhone battery replacement, screen replacement, and other top repair services.

whatsapp logo