So, maybe due to a nasty impact or an unknown issue, your iPhone seems to have run into a serious problem. And you can’t figure out what’s ailing your smartphone. We understand it can be super frustrating since you love your prized device and can’t bear to see it in anything but the perfect shape. Worry not, as there is a pretty straightforward way to check hardware issues on iPhone using panic.ips file. Let us guide you through it!
Wondering What is Panic.ips and How Can It Let You Diagnose Your iPhone?
iOS comes with a built-in diagnostic feature that allows users to find hardware issues on the iPhone. For those unfamiliar with it, the diagnostic feature, which has derived the name from Kernel, is a crucial component of any OS.
When the Kernel encounters an issue or an error while loading, the problem is termed as Kernel Panic, indicating that something critical has happened to Kernel and even stopped it from loading properly. When it happens, Kernel puts the entire diagnostic information in a file named panic.ips.
With the help of panic.ips file, it becomes a lot easier to get to the root of the problem. And once you have checked the hardware issues on your iPhone with panic.ips file, finding the right solution to the issue becomes relatively straightforward. That’s probably the reason why this hack never fails to impress both DIY lovers and the die-hard supertechies at Rapid Repair.
Figure Out If Your iPhone has Hardware Issues
iOS comes with a very helpful feature called “Analytics & Improvements” which lets you check if your iPhone has hardware issues. Moreover, it’s available even on old iOS versions like iOS 10, 11, or 12. So, irrespective of whether you are using an old iPhone or daily driving the iPhone 12 Series, you can use this diagnostic tool to figure out if your iOS device is facing a hardware problem.
To get started, head over to the Settings app on your iPhone > Privacy > Analytics & Improvements > Analytics Data.
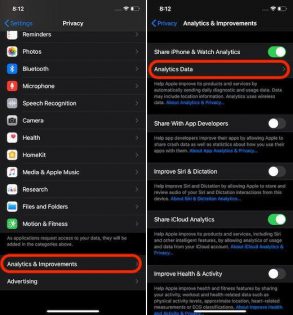
Note: In iOS 10 or 10.2, navigate to Settings > Privacy > Diagnostics & Usage.
On the next screen, you should see a lot of logs related to analytics. Now, scroll through the entire list to find an entry named panic-xxx.ips. The file can be either panic-base or panic-full.
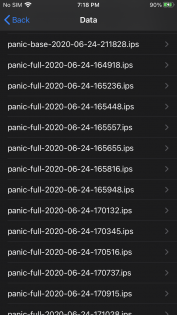
If you see any panic file, that means something very serious has happened to your iOS device, which prevented it from starting properly. Though it’s mostly an indication of a hardware failure which requires expert diagnosis and a repair to fix the issue, in some cases, it could be due to software crash as well.
Read – ‘No Service’ on iPhone? Try These Quick Hacks
Pro Tip:
- Though the “Analytics and Improvements” data doesn’t take much space, it’s considered better to remove them from time to time just to keep the device clutter-free.
- Luckily, it’s quite straightforward to wipe out the diagnostics information. To get it done, open the Settings app on your iPhone General >Reset > Reset Location & Privacy. Next up, you will need to enter your passcode to continue. Finally, tap on “Reset Settings” in the popup to confirm.
- It’s worth mentioning that the process of resetting location and privacy is slightly different in iOS 15 and later. Head to the Settings app -> General -> Transfer or Reset iPhone -> Reset. Now, choose Reset Location & Privacy in the popup that shows up from the bottom.
If the problem occurs less frequently or seems to be minor, the first thing you should do is restore your iPhone as new. You can get it done right from your iPhone. But be warned that it will wipe out all the existing data. So, don’t forget to back up the device beforehand via iCloud (Settings app -> profile -> iCloud -> iCloud Backup -> Back Up Now) or iTunes/Finder.
After you have taken the backup, head over to Settings app > General > Reset > Erase All Content and Settings (works in iOS 14 or earlier).
Do note that the process of erasing the iPhone has slightly changed in iOS 15 or later. You need to navigate to the Settings app -> General -> Transfer or Reset iPhone -> Erase All Content and Settings. Then, you will need to enter your device passcode to confirm that you want to wipe out your entire iOS device.
Once you have successfully erased your device, set it up as new. During the setup process, you will get the option to restore the device from a recent backup.
Besides, you can also use the Finder or iTunes to restore your device. But before going for the restore, do not fail to back up your entire device as it will wipe out all the existing data.
Side Note:
- In macOS Catalina or later, you will need to use Finder to restore the device. In macOS Mojave or earlier or Windows PC, you will need to use iTunes to restore the device.
After you have successfully restored your iPhone, check if the problem is gone. If it has, you are ready to go.
After you have successfully restored your iPhone, check out if the problem is gone. If it has, you are ready to go. But what if the issue persists? In this case, you should contact a reliable iPhone repair centre. With several years of excellent track record, Rapid Repair has come to be known as one of the best iPhone repair centres. Contact us to get your iPhone repaired fast.
