5 Tips to Stop Your iPad from Shutting Down Randomly

The Apple iPad may be one of the best tablets out there, but that does not mean it is devoid of issues. Rather, one of the most common problems that iPad users have to deal with is that of the tablet shutting down on its own. This can be one of the most frustrating things ever, more so when you are in the middle of doing something really interesting or important on the iPad.

That said, if your iPad reboots unexpectedly and you have no idea as to what is causing the issue, try out these 5 pro tips to stop your iPad from shutting down randomly.

Why Does the iPad Keep Shutting Down?

There could be multiple reasons why your iPad shuts down randomly. For instance, the problem could be due to a software bug, cluttered storage, or even a worn-out battery. So, we are going to look into each aspect and offer a viable solution accordingly with a view to fixing the issue.

Hard Reset Your iPad

This is often the first thing you should do when dealing with hardware or software issues in an iPad. This is how you can do a hard reset.

On iPad with Home Button: Press and hold on to the Sleep/Wake button and Home button simultaneously until you see the Apple logo on the screen.

On iPad without Home Button: Press and quickly release the Volume Up button. Then, press and quickly release the Volume Down button. Now, hold down the Top button until the Apple logo appears on the screen.

Read – iPhone WiFi is Slow and Keeps Disconnecting: Tips to Fix the Issue

Update your iPad

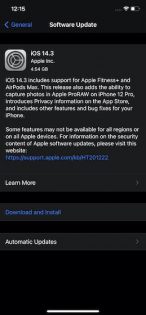
Updating your iPad to the latest version of iPadOS can also fix the problem. Since Apple often rolls out software updates with a ton of bug fixes and performance enhancements, there is a high possibility that updating the software may be able to fix the random rebooting of the iPad.

Over the Air Updates

  • For OTA updates, go to Settings >General > Software Update. If there is any update available, download and install it.

Update your iPad via Windows PC or Mac

Alternately, you can also update your iPhone using your Windows PC or Mac. Do note that if your Mac is running macOS Mojave or earlier or if you are using Windows PC, you will need to use iTunes to update your iPhone. However, if your Mac is running macOS Catalina or later, you will need to update your iPhone using Finder.

  • Connect your iPad with the PC/Mac.
  • Now, launch iTunes/Finder and then select your device.
  • Click on the Summary tab and then hit the Check for Update option.
  • If there is an update available, click on Download and Update option.

Recharge

The problem might also be due to the improper functioning of the battery and related software that could be preventing the iPad from running smoothly. The best way to rule out such a scenario is to drain the battery completely. After it has lost all its charge, here is what you need to do.

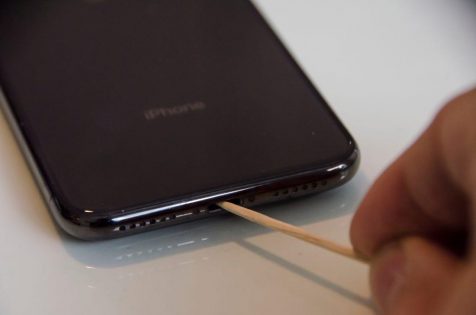
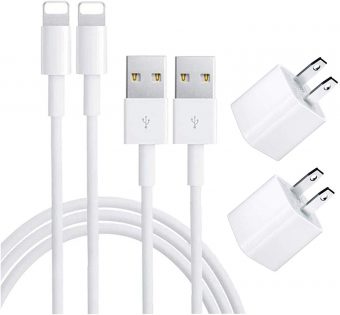
  • Plug the iPad to the mains. Remember to always use an original Apple charger.
  • See if the device is charging normally. Let it charge completely in one go.
  • However, if the iPad does not seem to be charging as it should be, there might be some issues with the charging cable or the mains.
  • Or if you are charging via a USB port on a PC, try a different slot.
  • Once it has acquired full charge, disconnect and check if it is still restarting automatically.

If the issue persists, you can try the solutions given below.
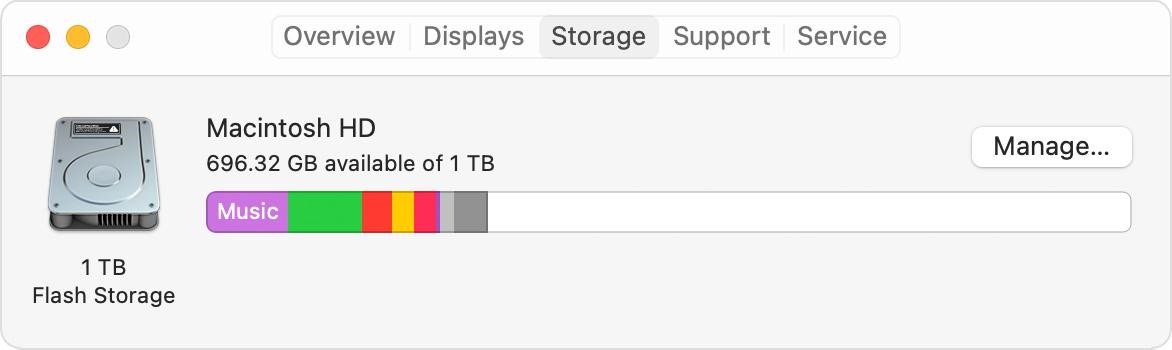
Declutter Your iPad

If your iPad still keeps turning off, declutter the storage. If you haven’t cleaned up the storage for a while, there is a good chance that it would be cluttered. The huge pileup of unnecessary files, app cache, redundant screenshots, and useless videos may have hogged up a ton of storage space. Not just that, even the useless apps may be creating problems and causing the iPad to shut down frequently.

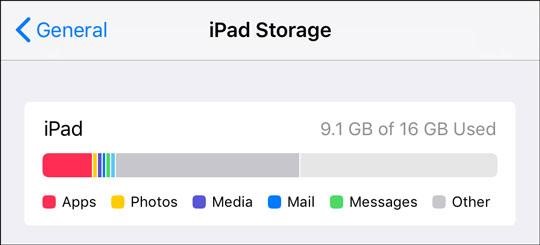
To resolve the issue, navigate to the Settings app on your iPad > General > iPad Storage. Now, iPadOS will show you a breakdown of how the storage has been consumed by each category, like photos, apps, media, and messages. Once you get a clear picture of the storage consumption, remove all the unnecessary files to retrieve plenty of precious space. With uncluttered storage, the iPad might finally get the better of the unexpected rebooting issue.

Read – Pro Tips to Fix Bluetooth Issues on Your iPhone

Factory Restore

If everything else fails, it is time to restore your iPad. However, make sure you have taken a backup of your device before factory restoring it to minimise the chances of data loss.

  • Connect your iPad to the PC or Mac. As before, make sure you have the latest version of iTunes installed on the PC or Mac (macOS Mojave or earlier). On Mac with macOS Catalina or later, make sure that the latest version of the macOS is running.
  • Go to iTunes/Finder and select your device.
  • Click on the Restore iPad option.
  • Follow on-screen instructions that appear.
  • When the process is complete, your iPad will be almost as good as new and will ensure there are no software or data corruption issues.
  • Remember to check if the iPad is functioning properly or if it is still shutting down on its own.

Contact the Pros

If none of the tricks mentioned above helps in troubleshooting the random rebooting problem of your iPad, there is a high chance that the problem is related to hardware. And in this scenario, you should contact iPad pros at the earliest.

With several years of expertise under our belt and backed by an experienced team of supertechies, Rapid Repair is a well-known Apple device repair centre. So, contact us to help you fix your iPad perfectly, professionally and affordably.
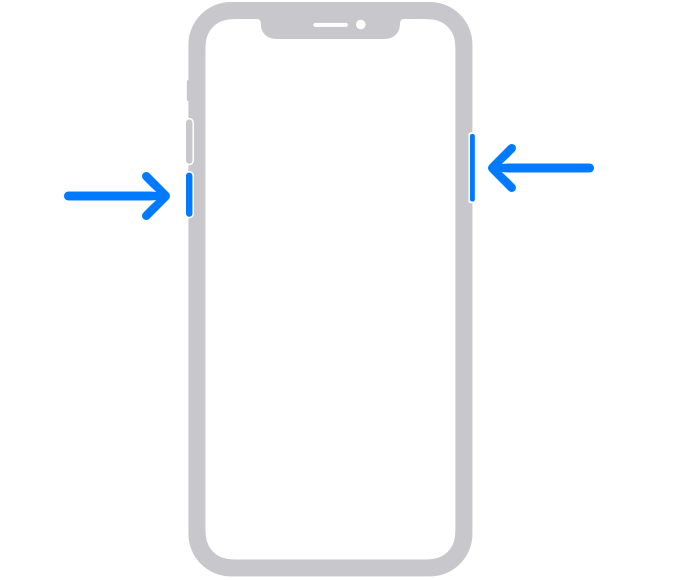
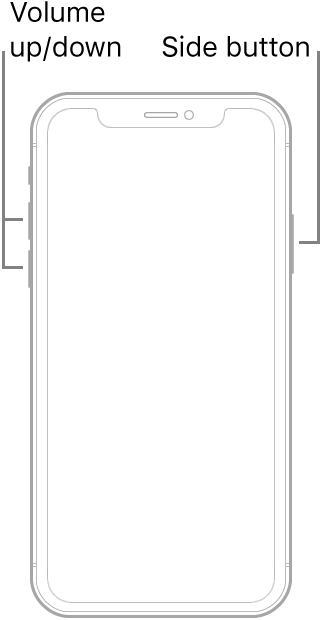
OnePlus 7 Pro Camera Settings And Tricks You Need To Know!

The iPhones and the Pixels sure pack in some punch when it comes to great photos, but trust us when we say that it’s possible to click awesome stuff even with a more standard phone like the OnePlus 7 Pro. Boasting top-of-the-line specs along with stunning cameras, which includes the 16 MP selfie shooter and 48MP + 8MP + 16MP triple rear-camera, the OnePlus 7 Pro has got what it takes to create really good photos. If you are serious about your mobile photographs, then make sure you do more than point at something and just press the click button. Here are some great tricks and tips that can produce some jaw-dropping photographs.

10 tricks to click fabulous photos with your OnePlus 7 Pro

#1 Customization of the OnePlus 7 Pro Camera Interface

It is easy to customize the shooting mode in your OnePlus 7 Pro and have your favourite modes next to each other. If you are someone who is more into the slow-motion mode over the pro mode, you can juggle it now.

The steps are rather simple – pull up the preferred-mode screen and tap on Settings. Then tap on customized modes and go about your modifications. However, the video and photo mode cannot be moved or removed, quite obviously.

#2 Select the 48MP mode for highly detailed pictures

Want to click a printable family portrait with your phone? This is where the 48MP shooter comes in handy. By default, the OnePlus 7 Pro produces 12MP images even though the sensor is 48MP. No denying, the pictures come out really good.

To activate the 48MP sensor, click on the pro mode and tap on the tiny JPEG 48 icon and you are good to go! This gives you highly detailed photos that you can even print without compromising on quality. Just have a look at our office photo below taken with a OnePlus 7 Pro.

#3 Leverage ultra-wide lens correction

The ultra-wide mode in the recent cameras is a rage and widely used, though they come with a major flaw of ending up with a slight fisheye distortion. In some phones, the distortion needs to be manually removed. However, with the OnePlus 7 Pro, the issue is taken care of by the phone itself. In the settings menu, just enable the Ultra Wide Lens Correction option.

Editor’s Note: For the uninitiated, the ultra-wide-angle lens captures images with an extremely wide angle of view. The ability to fit much of the foreground and the surrounding elements makes it a preferred choice for architecture and landscape photography. So, the next time you wish to amp your landscape photography or want to capture architecture shots like a pro, don’t forget to bring it into action.

#4 Get Smart with your phone photography

The Google Lens Integration on the camera app of OnePlus 7 range is a boon for smartphone users, especially OnePlus 7 Pro. It eases the process of recognizing common objects like bar codes, email address, phone number, among others.

To activate the lens, one has to long-press on the screen of the camera interface. The Smart Content Detection option gives the camera a good boost. For instance, if the camera detects a breath-taking landscape, it will notify you to use the wide-angle mode instead of the regular auto mode.

Just point your camera towards the subject and it will prompt! Enable the Smart Content Detection option by heading over to settings and toggling the switch on.

#5 Make way for beautiful and crisp night shots

With the Nightscape 2.0, OnePlus 7 Pro’s new night mode, one can get beautiful night shots. It uses an inbuilt long exposure photography tactic for low light conditions, which can help capture crisp photos with less noise and the right amount of light.

While OnePlus Pro’s night mode is pretty good in terms of capturing impressive shots at night or low-lit environments, there is one thing you must keep in mind. And that is camera stability. If you fail to keep the camera steady, you won’t get the desired result. Now, if you are wondering what might be the right way to prevent the smartphone from shaking, let us tell you that a tripod could be a great asset for snapping pro-looking night shots using your OnePlus 7 Pro.

Editor’s Note: You can get a super handy tripod from Amazon at around ₹500-1000. Among a plethora of options, there are three tripods that have managed to catch our attention. Hoteon (₹510), Powerpak LS (₹800), and Mobilife (₹1000). They are well-built and let you hold the smartphone in multiple orientations, perfect for the times when you want to have the enhanced flexibility to shoot pro-grade photos or videos. Oh yes, they also come equipped with a nifty remote to let you snap photos without having to deal with the last-minute shake!

#6 Get Rid of the Mirrored Selfie

If you aren’t a fan of mirrored selfies and often worry about the OnePlus 7 Pro’s camera snapping it by default, you aren’t alone. Well, the good thing is, you can turn it off/on at your will. Simply head to the Camera Settings on your OnePlus 7 Pro and disable the toggle right next to the Mirrored photo option.

#7 Get DSLR quality portrait shots

The 3x telephoto camera is a cool way to zoom in on your subject. However, using the required minimum distance is the only way you would get a clear portrait shot. The camera interface has an active indicator to alert you if you are too close or far from your subject. If the depth icon is green, you are good to go with your perfect shot. If it shows grey, it indicates a need for readjustment.

#8 Save RAW images from your phone!

How professional could the OnePlus 7 Pro camera get? RAW images by format are more flexible to edit than the standard JPEG images. From individual colour corrections to lighting adjustments, RAW images are known to be a favourite among avid photographers.

The RAW mode too, like the 48MP shoot mode, cannot be found simply in the settings. To activate, open the PRO mode and tap on the tiny JPEG icon and select RAW.

9. Zoom with Precision

OnePlus 7 Pro has made it pretty simple to zoom. If you are still using the age-old pinch gesture to zoom, be sure to master this nifty hack as it can play a key role in speeding up your mobile photography.

Image credit: GuidingTech

While you are inside the camera, touch one of the three icons gently on the camera interface and then slide your finger to the right slowly. Super handy, isn’t it? Now that you know how this hidden trick works, make the most of it to zoom like a pro.

Wish to Elevate Your Photography? Try Out the Pro Photo/Video Editors!

This is just an extra suggestion. If you have a liking for shooting photos and video, chances are pretty high that you would be sharing them on social networking platforms. Though most social networking apps come with a handful of built-in tools to let you enhance your shots, they are quite limited.

So, if you don’t want those restrictions to prevent your images/clips from garnering a ton of likes, we would recommend photo/video editors. While Snapseed and Adobe Lightroom are the best photo editors, FilmoraGo and Funimate are among the top-notch video editors for Android. Not to mention, these apps are available for free, so that you can get the most out of them without having to break your bank!

Bottom Line

For those who cannot fork out the cash for the biggie phones, OnePlus 7 Pro camera has a lot to offer. Overall image quality is super, and so there is already a lot of potential for great photography. Add to that our list of 10 great suggestions, and you can click pictures that are as good as DSLR photographs.

It’s worth pointing out that we have also covered a handful of common tips and tricks for OnePlus 7 Pro that can help you to not only get the most out of your flagship smartphone, but also enable you to fix some oft-repeated annoyances.

Though OnePlus 7 Pro has received high praise for fast and snappy performance, it is after all an electronic device and may run into issues for some reason or the other. This is where Rapid Repair – India’s most preferred OnePlus repair brand – comes into the picture.

Meanwhile, do not forget to share with us your favourite clicks!

iPhone WiFi is Slow and Keeps Disconnecting: Tips to Fix the Issue

Several users have reported that their iPhone’s Wi-Fi speed has become slow and that it disconnects time and time again on its own. It’s worth pointing out that the issue is not specific to a particular iOS version or the iPhone model.

If your iPhone is also facing similar Wi-Fi issues, take a look at these 5 pro tips and tricks. Since these tips have worked for many iOS users, we hope they click for you as well. With that in mind, let’s get on with the troubleshooting guide!

Turn WiFi OFF/ON and Restart your iPhone

For starters, you can turn the Wi-Fi Off and the back On again and then restart the iPhone. As this trick has worked for several users, you can give it a shot as well just to see how it fares.

Launch the Settings app on your iPhone and choose Wi-Fi. After that, turn off the Wi-Fi toggle and then restart your device.

  • To restart iPhone with Face ID: Press and hold the volume up/down button and side button at once. After that, drag the power-off slider to shut down your iPhone.

Image credit: Apple

  • To restart iPhone with the Home/Touch ID button: Press and hold the side/power button and then drag the power-off slider to turn off your smartphone.

Image credit: Apple

Hard Reset your iPhone

It is often recommend that iOS users to try out hard reset to fix common issues as it has always been a pretty reliable troubleshooter.

  • To hard reset iPhone 8 or later: Press the volume up button. Then, quickly press the volume down button. Up next, make sure to hold down the side button until the Apple logo comes up on the screen.
Image credit: Apple
  • To hard reset iPhone 7/7 Plus: Make sure to hold down the side button and volume down button at once until the Apple logo appears.
  • To hard reset iPhone 6s or earlier: Press and hold both the power and side button at once until the Apple logo shows up on the screen.

Once your iOS device has rebooted, check out if Wi-Fi has come back to normal. If it has, you have fixed the iPhone Wi-Fi is slow and keeps disconnecting.

However, if the issue persists, don’t be disappointed. There are still a few reliable solutions you can try.

Forget the Wi-Fi Network and Reconnect to It

Another handy solution for troubleshooting Wi-Fi issues on iPhone is to forget the Wi-Fi network and reconnect to it. Bear in mind that you will need to enter your Wi-Fi password, so make sure you remember it or have it saved somewhere.

Head over to the Settings app on your iPhone > Wi-Fi. Now, tap on the “i” button to the right of the Wi-Fi network name and then hit the Forget This Network option. After that, reconnect your iPhone to the Wi-Fi network.

Reset Network Settings

If your iPhone Wi-Fi continues to be slow and often disconnects, reset the network settings. The main reason why we suggest you try it because it is well-known for resolving Bluetooth and Wi-Fi issues on iPhone and iPad.

Go to Settings app > General > Reset > Reset Network Settings. Now, reconnect your iOS device to the Wi-Fi network and then browse the web for some time or watch any video online to check if the problem is gone. Do keep in mind, once you reset network settings, you will have to reconnet to all Wi-Fi Networks once again and also reconnect any VPN connections you might be using on your iPhone.

Update software

If the problem continues, update the software on your iPhone. Since most iOS updates come bundled with a ton of bug fixes and performance improvements, updating the software might do the trick.

Launch Settings app > General > Software Update. Now, download and install the latest iOS version.

If Nothing Works, Contact a Trusted iPhone Repair Centre

If all the above mentioned solutions fail to troubleshoot the Wi-Fi issues on your iPhone, it can be a hardware issue with the WiFi antenna. In this scenario, you should contact a trusted iPhone repair centre to get rid of the issue.

With a wide presence across several cities in India, Rapid Repair is the most preferred Apple device repair centre. Contact them to help you fix your iPhone.

How to Reset SMC, NVRAM/PRAM for M1 Powered MacBook?

No matter how powerful and efficient M1-powered Macs are, they are not immune to glitches. Just like other machines, a Mac may also run into issues such as freezing, unexpected sluggishness or random rebooting, and, when that happens you might need to reset the SMC or reset NVRAM/PRAM as part of the troubleshooting.

Sounds simple, right? But do you know that Apple does not offer a way to reset NVRAM or SMC on an M1 MacBook? So, to know how to deal with such issues in MacBook powered by the new M1 Chip, let’s explore further.

What is SMC and Why Does it Matter?

Does SMC reset M1? SMC or System Management Controller manages pivotal system controls including power, sleep function, fan speed and keyboard backlights. Being an integral part of any MacBook, SMC plays a vital role in helping the computer deliver peak performance, and when it starts ill-functioning, the performance is seriously impacted.

Interestingly, SMC is available only on an Intel-based MacBook, which means you do not have to bother about resetting it on your M1-powered MacBook. But to reset SMC, there’s a completely different take.

Read – Mac Won’t Update: 7 Best Tips to Fix macOS Update Issues

Note:

  • Resetting SMC on an Intel-based MacBook is quite straightforward. Simply select the Apple menu -> Shut Down. When your Mac has shut down, press the Shift-Control-Option keys and the power button at the same time. Release all the keys when you see the Apple logo.

What is NVRAM/PRAM?

NVRAM (Non-Volatile RAM) is the updated Mac terminology for PRAM (Parameter Random Access Memory). To be precise, it is a small amount of memory designed to store certain settings such as display resolution, sound volume, time zone, startup disk, and recent kernel panic information.

When Mac behaves erratically or does not boot up normally, make sure to opt for MacBook Pro PRAM reset.

Why Don’t M1-Powered Macs Have the Option to Reset SMC or NVRAM/PRAM?

While SMC does not exist on the M1 MacBook at all, NVRAM does exist but it works a bit differently than the Intel-powered MacBook. For a change, Apple has equipped the new MacBook with parameter memory for which settings can be viewed and customised with the terminal command NVRAM. However, they lack the command to reset NVRAM.

Note:

  • To reset NVRAM/PRAM on an intel-powered Mac, shut down your computer. After that, turn on your Mac and immediately press and hold Option, Command, P, and R keys at once. Release all the four keys after about 20 seconds during which your Mac will restart.

Now, that brings us to the important question as to why Apple does not let you reset NVRAM or reset PRAM on MacBook M1. Well, Apple claims that the M1 chip is more than capable to handle the issues that entail PRAM. Even though M1 is still too new for a full-on review, it has the crux to deliver a better performance than Intel. As per the reports, whenever you shut down your MacBook (not a restart), the M1 chip automatically detects if anything is wrong with the PRAM and resets it. This has not been tested properly but if this is how it works, all it needs for you to do is to shut down your MacBook, wait for a few seconds and then start it again to fix most of the common problems which earlier required resetting of NVAM or PRAM.

There are a couple of reasons why Apple M1 is far more efficient in terms of dealing with issues. First and foremost, Apple has absolute control over software and hardware. As a result, the tech giant can deeply integrate the chip with the hardware which is not possible with Intel. This system-level integration has a major role to play in enhancing the proficiency of the M1 Macs.

The second, the M1 chip is built around the same principle as A-Series/AX-Series chip that powers iPhone and iPad. Knowing how fast and efficient the A-series chip is as compared to Qualcomm’s processor, expecting the same amount of proficiency from M1 is not too much to ask.

Bottom Line

Since the day Apple unveiled the M1 chip, Rapid Repair‘s super techies, who are well-known for fixing Apple devices with unmatched precision, could sense that the end of Intel on Mac was just a matter of time. Having put our hands on almost every iPhone model, we have always wanted Apple to provide a custom chip specifically designed for Mac in the same line as the wicked-fast A-Series chip.

Hope the blog gave you enough insights on the MacBook Pro PRAM reset process along with how to reset NVRAM or PRAM on your Mac M1.

How to Recover Deleted Text Messages on iPhone and iPad

Did you accidentally delete important text messages from your iPhone? Worry not. Most of us have done it at some point or the other. So yes, we can feel your pain.

Fortunately, there are many ways to recover deleted text messages from an iPhone or iPad. So, you may now stop cursing yourself for the mistake and go through this detailed guide to learn the most reliable ways to restore deleted iPhone/iPad text messages.

Image credit: iPhone Backup Extractor

Restore Deleted iPhone/iPad Texts Using iCloud Backup

One of the most reliable ways to retrieve deleted iPhone/iPad messages is through the iCloud Backup. Yes, you read it right. If you had an iCloud backup before the accidental deletion of the messages then you can get them back with ease.

First, navigate to the Settings > Profile > iCloud > Manage Storage > Backups. Now, check the date of the iCloud backup to ensure you have the right back.

After that, head over to Settings > General > Reset. Now, tap on Erase All Content and Settings to wipe off all the existing data on your device.

Next, set up your device as usual. During the setup, restore your device from the iCloud backup. Once your device has been successfully restored, the deleted messages will be back on your iOS/iPadOS device.

Restore Deleted iOS/iPadOS Texts Using iTunes/Finder Backup

Another easy way to restore deleted texts is by using iTunes or Finder backup on your iPhone. Again make sure you have the backup before the messages were deleted.

It is worth noting that you will need iTunes on your Mac running Mojave or earlier or Windows PC. And if your Mac is powered by macOS Catalina or later, you will need to use Finder to restore your device from the backup.

Connect your iPhone to your computer and fire up iTunes/Finder. Then, select your device and hit Restore Backup. After that, select the preferred backup to restore your device.

Image credit: OSXDaily

Recover Deleted iOS/iPadOS Text Messages By Using Third-Party Data Recovery Software

Last but not least, you can recover deleted texts on your iPhone by using third-party data recovery software. Most of the time, a deleted message remains in the flash storage of the device until it is overwritten by new data. Hence, data recovery software can retrieve data.

Keep in mind that the iPhone/iPad data recovery software requires you to spend some bucks before being able to retrieve your lost data, including the text messages. Some of the tools that we have tried and found quite reliable are Tenoshare UltDataWondershare Dr. Fone, and PhoneRescue.

Notably, most data recovery tools offer a free trial so that you can try them without having to dole out any money. And, if the freemium version lives up to your expectations, you may even upgrade to the premium version.

Bottom Line:

So, here are some viable ways to recover accidentally-deleted text messages on iOS or iPadOS. Now that you know how this hack works, make the most of it and never lose any important messages.

Based on several years of expertise in dealing with Apple devices at Rapid Repair, we can tell you that iTunes/iCloud backup often works in restoring the deleted data. That is why we always recommend our readers keep the latest backup of the device.

Though rarely, but still iPhone is not immune to hazards or sudden crashing that may result in data loss. Therefore, it is apt to go for the additional layer of safeguard in the form of a timely backup.

Retrieving deleted data seems quite straightforward when you have a backup. As for using third-party data recovery tools, you should try them as last resort. And that too after giving a close look at the freemium offerings.

Mac Won’t Update: 7 Best Tips to Fix macOS Update Issues

We all detest lengthy and heavy software updates but let’s just be honest, there’s no life to your Mac or iPhone device without these updates. But the real problem starts when the mac won’t update. A large number of macOS users have recently reported that their Mac won’t update and there’s a buzz for search words on search engines for ‘how to update mac?’ trending, asserting that the software installation seems to either get stuck in the middle of the update or simply fail to kick in right off the bat. Having experienced and fixed this issue multiple times, we have come up with a handful of reliable solutions to troubleshooting the ‘Mac won’t update’ issue. If the problem has gripped your computer as well, give these trusted tips and tricks a shot.

Ensure There’s Enough Storage

The very first thing that you do to resolve the macOS update issues is to check whether or not you have enough space to accommodate the software update.

Click on the Apple menu and choose About This Mac. Now, click on the Storage tab. Next, you should see the total available storage on your Mac. If your Mac is cluttered for space, delete all the redundant files and apps that have clogged up a lot of space. You need ample space, first to download the update files and then for the updates to install. Once installed, the original files are deleted, but for the whole process, you need enough space for both steps. Hope this aids your macOS update or you move to the next steps.

Restart Your Mac

If you are unable to update your Mac even after you clean up the storage, restart your Mac. A normal restart often fixes random issues. So, give it a try. Once your Mac has rebooted, head to the System Preferences > Software Update and try to install the update.

Turn OFF/ON Wi-Fi

Software updates often fail or tend to come to an abrupt halt due to poor Internet connection. So, make sure your Mac is connected to a stable internet connection.

Click on the Wi-Fi menu and turn it off. Now, wait for some time and then turn it on. After that, kickstart the software update, as usual, to check if you have finally got the better of the issue. You can also try to restart your router once, if simply turning Wi-Fi off and on doesn’t do the trick.

Check For Server Errors

When Apple’s servers face an outage, many things come to a halt including the macOS update. Hence, make sure Apple’s system status for Mac updates is live and running.

Go to Apple’s system status page and ensure that the circle to the left of the macOS update is green. If it is grey, grab a cup of hot coffee and wait until the outage is over.

Reset the NVRAM

More often than not, resetting NVRAM gets rid of many common problems. Thus, if none of the solutions has come to your rescue in troubleshooting the macOS update issue, bring it into action as well. To get started, turn on your Mac. Then hold down the command-Option-P-R keys as soon as your computer powers on. Hold down these keys for about 20 seconds and then release them. On an older Mac that chimes at boot, press and hold the keys until you hear a second startup chime.

Safe Mode – Try Safe Mode Configuration

Another highly reliable solution for fixing a Mac that won’t update is the Safe Mode. By blocking the problematic apps and software, it allows the Mac to boot up securely, which often fixes miscellaneous issues. Having found success with this reliable hack on several occasions, we would recommend you to give it a chance as well. First off, turn off your Mac and then immediately press and hold the Shift key until the login screen appears. After that, let go of the Shift key and log in. Once your Mac has entered the safe mode, try to update it. After your Mac has successfully updated, restart your Mac normally to exit the safe mode.

Try Out Combo Update

If the problem persists and the mac won’t update, go for the combo update. For those unfamiliar with it, a combo update is a combined update that consists of all the changes since the rollout of the original version. For instance, you can use the combo update to jump directly from macOS 11 to macOS 11.4 by skipping the minor updates. Many users who had run into this issue had reported that the combo update was able to fix it. Therefore, you shouldn’t miss out on it as well. Head over to Apple’s combo update site and find the suitable combo update. Then, download it following the instructions.

Set Date & Time To Automatic

If you still have problems with the macOS update, you may try this option too. For one reason, or the other, people set their macbook’s time to display a custom time and that may prove to be a hindrance for mac updates.

Go to System Preferences > Date & Time > Tick the box to “Set Date & Time Automatically”


Set Date & Time To Automatic

There you go! Hopefully, you have taken control of the issue and your Mac is successfully updated. As these solutions have worked for many Rapid Repair–India’s eminent Apple repair centre–customers in troubleshooting the macOS update issues, we don’t see any reason why it won’t work for you as well. But before you dive into the all-new features of the update, be sure to share your thoughts in the comments section below.

Want to learn more about the latest iPhone, OnePlus, and other Apple updates first? Stay connected with the best and quickest repair experts in your city today!

Tips to Fix OnePlus Microphone/Headphone Issue

The stock Android experience backed top-notch hardware at a killer price point is what makes OnePlus smartphones stand out. But then again, random issues are part and parcel of technologies and OnePlus’ offerings are no different.

One of the most common issues that a large number of OnePlus users have reported recently are problems with microphone or headphone. While some users have reported that the microphone doesn’t deliver audio at all, others have complained that their ear speaker or even headphones (when connected with the device) don’t provide audio properly. Whatever could be ailing your device, we have got you covered with some viable tips and tricks to troubleshoot the OnePlus microphone or headphone issue. That said, let’s get started with the guide!

Restart Your OnePlus Device

To get started, let’s first try out the solution that often works in fixing common issues. As you may have already guessed, we are talking about the restart. Whether it is solving the app freezing issues or the sluggishness, a quick restart often comes in handy in taking control of miscellaneous problems.

Press and hold the power button and when the power options shows up, press the Restart option. Once your OnePlus device has rebooted, check out if the microphone/headphone has started to work normally. If it has, you are good to go!

Remove gunk from the microphone hole

Believe it or not, tiny particles of smudge and gunk often tend to sneak into microphones and prevent them from working properly. At times, gunk or debris completely blocks the microphone from delivering sound. Therefore, it’s always recommended to clean them frequently.

You can use a soft ended toothpick to clean the microphones. Be sure to do it gently as the microphones could get damaged due to hard rubbing.

Reset the Headphones

If you don’t get sound through the headphones, try to reset them. The problem might be with the headphones and not the device itself.

In case of wireless Headphones, the process of resetting headphones vary, take the help of the user manual if you need assistance. After that, reconnect them. Once you have reconnected your OnePlus smartphone to the headphones, check out if the audio is back. In case of wired Headphones, try and clean the connector and the jack and then see if you start getting any sound.

Update Software

No solution as yet? Don’t worry as we still have a fairly reliable solution in the form of a software update to troubleshoot the headphone or microphone issues on the OnePlus device. Most software updates come bundled with a range of bug fixes and performance enhancements. So, updating the software on the device may work in getting rid of the issue.

Image credit: OnePlus

Head over to the Settings app on your device and choose System. Now, tap on System Updates. Then, click on Check for updates. If there is any update available, download and install it on your OnePlus smartphone.

Reset Your Device

If the microphone/headphone issue still persists on your OnePlus device, it’s time to go for a radical solution. With a radical solution, we mean erasing the entire data and resetting the smartphone. As the complete cleanup often fixes even complex issues, it often resolves this issue as well as long as it due to a software related problem.

Before erasing the entire content, make sure you have backed your device (Settings > System > Backup). Launch Settings app on your smartphone and choose System. After that, tap on Erase all data. Then, tap on Reset Phone.

Image credit: OnePlus

Next up, enter your password/PIN and hit Next. Finally, tap on ERASE EVERYTHING to confirm the action.

If Nothing Works: Contact a Trusted OnePlus Device

If none of the solutions mentioned above has worked in solving the microphone problem or the ill-fated headphones issues on your OnePlus smartphone, there might be some hardware issues. If you are still facing issues with earphone, headphone or microphone even after trying all the above steps, contact a trusted OnePlus repair centre to fix your smartphone.

Speaking of a trusted OnePlus service centre, Rapid Repair is an eminent name across India. Thanks to the fast and efficient service at a cost-effective price point, we have emerged as the most preferred destination for troubleshooting OnePlus issues. So, reach out to us at the earliest to fix this issue.

How to Fix Apple App Store Not Working on Mac

Even though Apple frequently releases software updates for macOS (just the way it does for iOS and watchOS), the operating system keeps throwing weird issues in the wind that sometimes leave you scratching your head wondering what’s gone wrong. Apple App Store not working issue on Mac is one such example.

But fret not, as in this detailed troubleshooting guide, we have come up with some viable solutions to fix Mac App Store issues. So, if you are unable to download apps on your Mac or find the macOS App Store too problematic, try out these tips to get rid of the issue.

Image credit: Apple

Force Quit the App Store and Relaunch It

Force quitting often sorts out freezing or crashing apps. So, if the Mac App Store is crashing randomly or seems to get frozen, force quit the app. Simply right-click on the App Store icon choose Quit App. Or click on the Apple menu at the top right corner of the screen and choose Force Quit. Now, select App Store and hit Force Quit.

(Image Credit: Apple Toolbox)

Check Internet Connection

If the issue persists even after the force quit, check the internet connection. Turn off Wi-Fi and then restart your Mac. Once your Mac has restarted, turn on Wi-Fi. Now, launch the App Store and try to download any app to see if the problem is gone. Check your internet speed to ensure you have a good connection, as App store needs a stable connection to work and download apps properly, specially Apps large in size.

Ensure that Apple’s Systems Are Running

When Apple’s systems face an outage, several core functionalities such as downloading and installing apps come to a halt. So, make sure to check out if Apple’s systems are up and running. If they are down, wait for some time until the outage gets sorted.

Head over to the system status page and then check if the circle right next to Mac App Store is green. If it is not, then Apple’s system is going through an outage. If any service is Red, it means the service is down and we need to wait for it to be again to use it.

Make Sure Mac App Store is Not Restricted

You or someone else may have mistakenly restricted Mac App Store and forgotten to remove the restriction. If that’s the case, be sure the macOS App Store is not limited to using Screen Time. Launch System Preferences and choose Screen Time.

Now, click on Content and Privacy in the sidebar and choose the Apps tab. Next, click on Options at the bottom left corner of the screen and then ensure that the Mac App Store is not unrestricted.

Sign Out of Apple ID and Sign Back In

If the Mac App Store still remains dysfunctional, try to sign out of your Apple ID and sign back in. Often, a fresh sign-in process does the trick in fixing miscellaneous issues.

Image credit: Apple

Click on the Apple menu and select System Preferences. After that, click on Apple ID and select Overview in the sidebar. Next, click on Sign Out. Now, go through the onscreen instructions for copying and downloading your data stored in iCloud. Next up, follow the same steps to sign back in.

Update Your Mac

No solution as of yet? Bother not, as the latest software update could well be the answer to your problem. With every latest update, Apple introduces a bundle of bug fixes, changes, and performance enhancements.

Hence, the easiest way to keep your Mac away from the miscellaneous issues is to update the software frequently. Hopefully, it will fix the “Apple App Store not working” issue on your Mac. Open System Preferences app on your Mac and then select the Software Update. Now, download and install the update by following the usual process.

Bottom Line:

Having successfully resolved the Mac App Store not working issue on numerous occasions at Rapid Repair – an eminent Apple device repair centre, we can vouch for the above-mentioned solutions to get the job done for you. There are several other reasons why App Store might not connect like issues with the library files, certificates, or even the firewall may be blocking connections to App Store. In such cases, it is a little difficult to fix them using DIY solutions and need an expert to fix them, in which case we are always here to help you.

Known to sort out both hardware and software issues with unmatched proficiency, Rapid Repair is always here to provide you with the best repair work at a cost-effective price. So, reach out to us in order to resolve any problem.

What is the Genuine Battery Message Alert on iPhone? All You Need to Know

Just like any other manmade product, built-in lithium-ion batteries in an iPhone have a limited lifespan. Eventually, they get worn out and stop delivering peak performance, resulting in random rebooting and unexpected battery drain issues. Not just that, worn-out batteries may also cause the iPhone to overheat.

Once you get your battery changed from a non-Authorized Apple service centre, Apple starts showing a Genuine battery message alert on selected iPhone models. If you are getting an alert on your iPhone about the genuine battery message and wondering what it is, this guide is for you.

Image credit: Apple

Why is Genuine/Important Message Alert Appearing on Your iPhone?

Apple has always been exceptionally concerned about using high-quality parts in its devices. It’s no secret that the Cupertino-based company wants to have complete control of its devices, which leaves very little room for an independent repair. While this behaviour can easily be referred to as the classic “Money Digging” tactic with which Apple is famously associated, we have always admired the tech giant for taking extra measures to prevent users from falling prey to non-genuine parts.

In this case, however, Apple has decided to show this message if the battery is not changed by an authorized Apple Service Center, and even if the battery is a genuine OEM battery of the same quality as the one Apple uses. Forget OEM battery, if you take 2 brand new iPhone XR, for example, and swap the batteries of the 2 phones on your own, you will start getting this message on BOTH the devices. The message is not an indication on the quality of the battery or the type. If simply indicates that the serial number of the replaced battery does not matches the serial number stored in the settings of the device. When an Authorized Service Center puts in a new battery, they use a special software to calibrate the new serial number so that your iPhone starts recognizing this replacement battery as its own. Since this software is not available with anyone else but Apple, this message is something one has to live with, whenever the battery is replaced in certain models of iPhone.

On which iPhones does the Important Battery Alert Appear?

The genuine battery alert appears on iPhone XS, iPhone XS Max, iPhone XR, iPhone 11, 11 Pro, 11 Pro Max, iPhone SE 2, iPhone 12, 12 mini, 12 Pro, and 12 Pro Max. To be more precise, the battery health shows up only on the 2018 iPhone models and higher ones.

The alert reads, “Unable to verify this iPhone has a genuine Apple battery. Health information not available for this battery.”

You may also see an additional message stating that “Apple has updated the device information for this iPhone.” It means that the tech giant has updated the device information for your iPhone for safety analysis and service needs.

How Long does the Genuine Battery Alert Exist on Your iPhone?

As soon as Apple detects the use of non-genuine battery parts on your iPhone, it shows up the important battery message right on the lock screen as a clear warning. The message stays on the lock screen for the first 4 days and in the Settings for 15 days.

After that, you can head over to Settings > Battery > Battery Health to check the battery alert.

Does This Message Affects Your Ability to Use the  iPhone?

No. Apple clearly states that the “Important battery message” doesn’t affect your ability to use your iPhone. As mentioned above, the alert is just to inform you that the replaced battery is not recognized by the iPhone. It has absolutely no bearing on the performance of the battery. The only drawback is that the battery health is not visible in the Settings directly but can be checked via 3rd party Apps and software.

Bottom Line:

Widely recognized as one of the most trusted iPhone repair centres across India, Rapid Repair has always been a strong proponent of genuine parts. Considering how crucial a role the battery plays in helping a smartphone (or for that matter any device) deliver peak performance, it can be worrying for some people that the iPhone will display this kind of a message post battery replacement. Rest assured, the battery used by us is of the highest quality, we use only genuine OEM parts, and comes with 1 year warranty on performance and are stress tested post installation. The message or the battery health not being displayed has absolutely no bearing on the performance of the battery and once we replace the battery, you can use it like it was a new iPhone without any worry.

How to Fix “This Accessory May Not Be Supported” in iPhone

Has this ever happened to you? Your iPhone is just about to die due to low power and you plugged it in for charging and there comes this old-age prompt ‘this accessory may not be supported’. The moment you connect the device to a charging cable, the “This Accessory may not be supported” error pops up on your iPhone, bringing the charging process to a halt. Probably that is why you are here, looking for reliable ways to fix the issue. So, apart from other hacks for faults like ‘iPhone charging cable not working’ or ‘charger saying accessory not supported’, you can find the right answers here below.

If things still don’t work well on the DIY mode for you, don’t hesitate and contact the top experts in the city.

This article has a few workable tips to resolve this common problem. And since they have done the trick for many users, we are sure they can get the job done for you as well. So, let’s cut to the chase without any more ado!

So how to stop this accessory not supported iPhone repair issue? Well, chances are that you might be able to pull-off a miracle but if not, Rapid Repair will be there to take your parcel from home and bring it back to your doorsteps.

Clean the USB Port and the Accessory

The very first thing that you should do is to clean up the gunk or smudge that may have accumulated inside the charging port. It may be preventing the charging accessory from making a solid connection. So, ensure that the Lightning port is clean. You can use compressed air or a toothpick to clean the Lightning port of your iPhone.

Image credit: BusinessInsider

Make sure to do it very carefully, so that you don’t damage the port while trying to get rid of the lint. If the pins get bent or damaged, there is no other option but to get the jack replaced.

Try a different charging cable

Another easy solution is to simply try and use any other charging cable you may have in the house. If the device starts charging with the other cable without showing the error, then the problem is with the cable itself and needs replacement. Apple charging cables are something we can tag as handle-with-care but chances are 3 to 6 months down the line you will face the iPhone cable not working issue so be prepared and take a handy second-hand wire that will do the same job.

Ensure That the Accessory is MFi Certified

Another thing worth taking note of is to ensure that the charging cable or headphone you are using is either an original Apple product or is MFi (Made for iPhone/iPad) certified. If you are using an uncertified or aftermarket charger, chances are pretty high that the problem could be due to it.

You can get an MFi certified iPhone charger at around Rs. 1500-2000 from Amazon or Flipkart. Both in terms of security and efficiency, a certified charger is a better option. So, you shouldn’t compromise on it.

Make Sure the Accessory Is Not damaged

The “Accessory may not be supported” error on an iOS device is also found to appear due to damage to the accessory being used. So, you should ensure that the charging cable or the power adapter is in a good condition to charge the iPhone, at least physically.

Image credit: iDownloadBlog

Restart Your iPhone

If the “Accessory may not be supported” message is still popping up on your iPhone, try to restart the device. More often than not, a simple reboot can help you fix random glitches. Thus, do not fail to give it a try.

  • To Restart your iPhone X, 11, or 12: Press and hold the volume button and the side button. Then, drag the power off slider to shut down the device. After that, hold down the side button to restart your device.
  • To Restart Your iPhone SE 2, iPhone 8, or Earlier: Press and hold the sleep/wake button and then drag the power off slider to shut down the device. After that, press and hold the sleep/wake button to restart the device.

Update Software on your iPhone

If the problem still persists, there is a small chance that it might be due to a software bug. And in this scenario, the software update is required. With every new update, Apple releases a number of bug fixes and performance enhancements to improve the overall experience of the iPhone. Therefore, head over to the Settings app -> General -> Software Update. If an update is available, download and install the latest iteration of iOS on your device.

The Bottom Line

So, our guide on sorting out the “accessory not supported on iPhone” error ends here. Hopefully, you will get this issue under control now and your iPhone will start to charge as usual. iphone accessory not supported fix or any other error, you can get to the root with an easy demo, you can watch online.

In most cases, this error appears due to an uncertified charger. Therefore, charging the device with an MFi certified charger can fix the issue.

Apart from a faulty charger, dust/lint or physical damage to the charging accessory is also equally responsible for the issue. As for the software bug, it’s quite rare. However, we should never rule out the possibility of the software bug, since it has been the wrecker-in-chief behind several major iOS issues in recent times.

If nothing helps, the problem might be either with the charging port itself, it might have got internally damaged due to years or use or in some cases, it can be a hardware problem originating from a faulty charging IC or TriStar IC on the motherboard of your iPhone or iPad.

In these cases, it is unlikely that you can fix the problem by following the steps we have suggested, but no need to worry you can fall back to us. We are here to help you when all the above steps have failed. Feel free to reach out to us as we are always here to help you fix your iDevices, including iPhone, iPad, Apple Watch, and MacBook.

Device not supported – or any other damage or software problem in your Apple or OnePlus device, contact Rapid Repair today and book your rider of the day to assist with your pick-and-drop.

whatsapp logo