What is Flexgate Issue with MacBook Pro Display and How to Fix It?

Did you know? The seamless integration of hardware and software is what puts MacBook Pro ahead of the curve. Though the device excels in delivering a top-notch experience, it has had its own share of issues including display problems with several MacBook Pro models that has proved to be a nightmare for a large number of users. Flexgate is the term used to describe a display problem with certain models of MacBook Pro caused by a faulty Flex cable. Once the problem was diagnosed and public, the netizens were quick to dub it as Flexgate, as soon as the flex cable was identified as the main source of the problem. To resolve a MacBook pro flexgate issue, you must understand what the problem is before getting into the depth of things.

A Detailed Guide Just For You – With 2022 Updates

Noting how prevalent the problem has become, we have created a detailed guide about the Flexgate issue with MacBook Pro display and its possible solution. So, if you are facing the same issue, read on to discover the ways to get rid of this MacBook Pro display problem.

What is the Possible Cause of the Flexgate Issue?

Before getting into the heart of the flexgate problem with MacBook Pro display, it would be apt to pinpoint the possible cause. Though most modern versions of the MacBook pro contain 2mm longer display cables to get rid of this problem, some might still come up with technical snags due to thin and faulty cables. The affected MacBook models use thin and weak display flex cables. As the flex cables are loosely wrapped around the display controller board, they are pulled tight every time you open and close the lid of the device creating room for an easy MacBook pro flexgate issue to pop up any moment.

In such a scenario, the backlight cable usually breaks first, which results in various backlighting issues. It is also responsible for the complete failure of the display at times.

Which MacBook Pro Models are Affected?

Apple launched a redesigned MacBook Pro with an all-new flex cable in 2016. Therefore, the Flexgate issue appears to impact any 13 or 15-inch ‌MacBook Pro‌ model manufactured in 2016 and 2017 (sold between October 2016 and February 2018). Going by several reports, it has mostly impacted Touch Bar models. But last year, Apple installed additional silicone protection to solve their jamming issues and whether it really works or not needs to be seen or asked from people who’ve made recent purchases and yet require MacBook pro flexgate repair experts to attend to their new device.

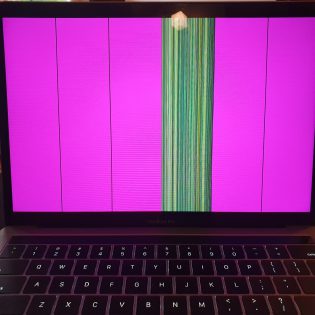
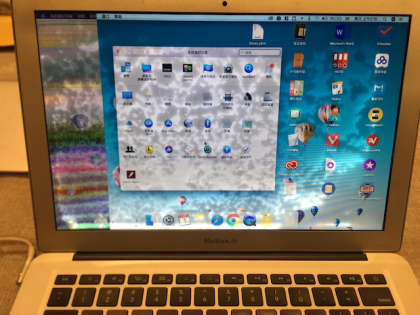
Image credit: Apple Support Community

If the display backlight shows vertical bright areas at the bottom of the screen occasionally/consistently or there are large vertical bars on the display or if the display completely stops working, there is a strong chance that your MacBook Pro is affected by the Flexgate problem.

Apple Backlight Repair Program

As is always the case, Apple has taken note of the flexgate issue with the display once it was out in the public and reported by a lot of affected users, and launched the backlight repair program to service the affected notebook free of charge.

The tech giant has listed out the following eligible MacBook Pro models:

  • MacBook Pro (13-­inch, 2016, Four Thunderbolt 3 Ports)
  • MacBook Pro (13-­inch, 2016, Two Thunderbolt 3 Ports)

Find Out If Your MacBook Pro is Eligible for Apple Backlight Repair Program

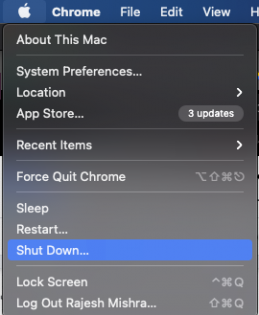
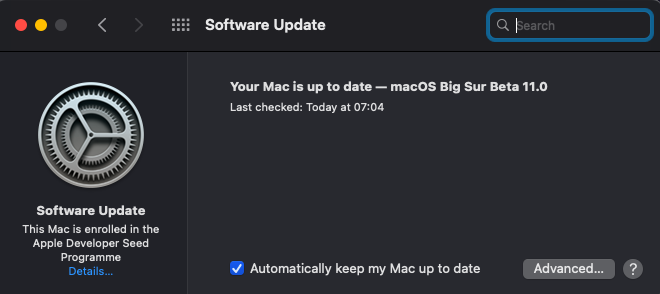
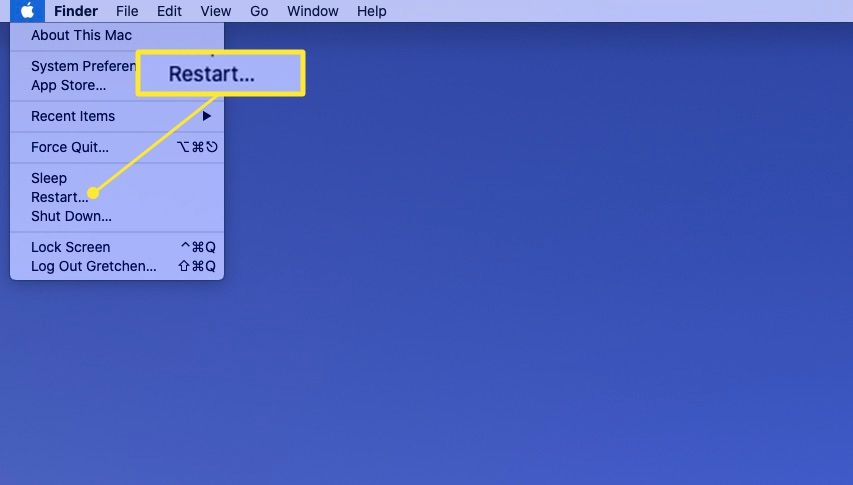
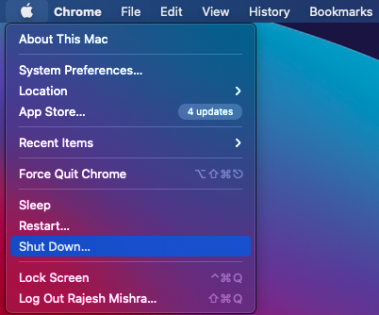
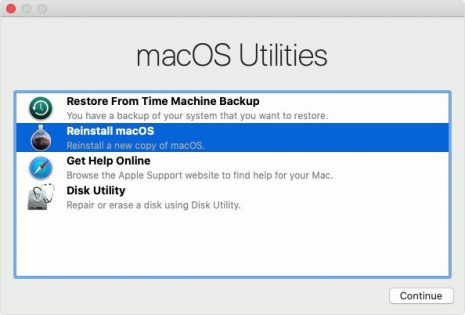
You can easily find out whether or not your MacBook is eligible for the backlight repair program. All you need to do is click on the Apple menu and choose About This Mac.

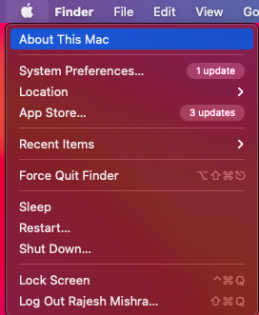
Now, check out the details of your notebook to know if it is eligible. If it is, make sure to back up your entire data before contacting Apple for the free service.

What If Your Affected MacBook Pro or Air is Not Eligible for the Repair Program?

Though Apple has been pretty quick in identifying the affected MacBook Pro models, we will not rule out the possibility of more devices being impacted by these issues.

Even though Apple did make the essential changes to solve the flexgate MacBook Pro 2017/2016 issue, we have come across some 2017/2018 models that might also be affected by this problem and not covered under the free repair program. Fortunately, older MacBook Pro models are not affected by this issue as they come with a more durable wire which has been routed through the hinge and not around it. Thus, it is more equipped to resist stress.

What if your affected MacBook Air or Pro is not eligible for the Apple repair program? In this scenario, you should contact a MacBook repair Centre to get the notebook fixed or call for a MacBook pro flexgate repair expert near you.

Apple Extended Backlight Repair Program For 13-Inch MacBook Pro

If your MacBook flexgate issue keeps flaring up every now and then you might want to remember or revisit the announcement Apple made in January last year where it claimed to have extended the backlight repair program for the 13-inch MacBook pro.

For other versions and MacBook devices, you can contact Rapid Repair – known for offering fast and cost-effective solutions. Rapid Repair has become a kind of go-to platform for fixing MacBook. What sets us apart from the rest, is our ability to sort out both complex hardware and software issues. So, contact us if you want to resolve the display issues of your MacBook Pro at the earliest.

For MacBook flexgate repair experts or anything extravagant for your device – contact today to book an early appointment.

7 Pro Tips to Fix MacBook Overheating Issue

When Apple released their fan-less MacBook Air lineup capable of achieving such high performance without making any noise, it turned heads across the world. With the introduction of the new M1 chips. Apple again made a statement. While an 8-core CPU and 8-core GPU improves the laptop’s performance to a great extent, users are still facing heating issues in the MacBooks.

And it is not just limited to older laptops that have been in use for years, even the newly released M1 Macbook Air and Pro get overheated when users juggle between apps, open a lot of tabs in Google Chrome, or use the laptop without proper ventilation. If you’re facing MacBook Air or Pro heating issues, here are some helpful tips and tricks you can follow to fix the Mac overheating problem on your own.

Use Activity Monitor to Find Out What’s Eating into More Battery

Activity Monitor is incredibly helpful in finding out the apps that consume more resources like CPU. So, the first thing you should do is to open Activity Monitor (Finder > Applications folder > Utilities) and then take a close look at how the resources are being used on your MacBook.

If you find some apps using more resources, delete them. If you don’t want to get rid of them, use their alternatives that consume fewer resources.

Once you have taken control of the resource-hogging apps/services, your MacBook may stop overheating straight away.

Remove a Bulky Case to Improve Heat Dissipation (also: Ensure that the Chargers aren’t Damaged or Uncertified)

Some bulky cases do not allow the notebook to dissipate heat freely, which triggers the overheating issue. Therefore, make sure the case has a neat venting designed for improved heat dissipation.

Just in case the cover doesn’t have a vented design, replace it with a lightweight and slim design. Besides, ensure that the chargers are certified as uncertified chargers tend to cause the MacBook to overheat.

Reset SMC

Resetting SMC (system management controller) has long been a reliable hack for taking control of the thermal management of the MacBook. When the fan of the notebook runs high, it comes in handy in cooling it down.

Simply click on the Apple menu and select Shut Down. After your notebook is turned off, hold down the “shift+option+control” keys on the keyboard and the power button simultaneously.

Keep holding them for 10 seconds and then release them. Next, press the power button to turn on the notebook. Once your laptop has restarted, use it for some time to see if the problem has gone.

Keep the Vents Clean

While it might not be so obvious, but your MacBook does have a ventilation area near the screen hinge. This is from where your MacBook expels heat and it is important that you keep this area clean and free of any dirt, dust, or debris buildup. You can use compressed air to blow on the vents and make sure that it is clean for heat to pass through.

Clean Up Your Mac

Overheating issues also crop up due to cluttered storage. If you haven’t wiped out unnecessary files for a long time, chances are high that they may have piled up to not only capture plenty of storage but also reducing the speed of the device.

When a MacBook becomes sluggish, it impacts the overall performance and even triggers unexpected battery draining. As a result, the notebook becomes hot randomly – at times so hot that you cannot even Hold it on your lap.

Enable Automatic Graphics Switching

Many MacBooks have both integrated and discreet graphics processor in their system. The discrete graphics processor is more powerful but requires a lot more resources and cause your MacBook Pro to heat up. By enabling the Automatic Graphics Switching option, the system will automatically detect which graphics card is needed for which task and will use integrated graphics for less power hungry tasks keeping the overheating issues in check.

You can go to System Preferences > Battery to enable the Automatic Graphics Switching option if it was not enabled by default.

Update Your MacBook

In some rare cases, the overheating issue crops up on Mac Due to software or OS related issues as well. In this scenario, the software update is always the right way to go.

Moreover, Apple almost always releases a new update with a long list of bug fixes and performance improvements. Therefore, it is always advisable to keep the Mac updated to the latest iteration of macOS.

To do so, head into System Preferences > Software Update and then install the latest version of macOS as usual.

Close Unnecessary Tabs

One of the biggest reasons for your MacBook Pro heating up is because you have kept a lot of tabs in your browser open. Internet browsers can put a lot of strain on your laptop’s CPU and forces the fans to work harder to keep the temperature around the CPU down. This causes the MacBook Pro heating issue quite often.

While a lot of users prefer third-party browsers like Google Chrome, Firefox and more to surf the internet, Apple’s in-built browser Safari is is way more friendly for your system. It is less resource hungry and is optimized to prevent the MacBook heating issue.

Use Energy Saver Settings

Although you might have opened just one tab in Google Chrome and not working on any other app, you can hear the fan kick in out of nowhere and your MacBook Air starting to overheat. This is a common occurrence for a lot of people and they can’t figure out what’s causing this MacBook Air overheating issue.

This can be resolved by using your MacBook in the energy saving mode. In this mode, your system will stop any apps from running in the background if they aren’t necessary as they are reason behind the MacBook heating issue. Go to System Preferences and then click on Energy Saver to open the energy saver menu. Here you can switch on Automatic Graphics Switching, choose when to Turn Off the display to save power, whether to put the hard disk to sleep and more.

Check Your MacBook Fan

No luck as yet? Don’t worry as we still have a reliable way to nab the culprit.

When the cooling fan gets worn out or unable to function properly, the MacBook tends to become hot. So, now we are going to check whether or not the MacBook fan is functioning properly.

To get started, remove all the peripheral devices from your MacBook and then shut it down.

Next, turn on the laptop and hold the D key to start the Apple Hardware Test/ Apple Diagnostics.

Then, go ahead with the on-screen instructions to begin the test. Once the basic test is over, check the box to start the advanced test.

After the advanced test has finished, if you find the reference codes beginning with PPF, your MacBook’s cooling fan may be at fault. You will need to repair the cooling fan to get rid of the problem.

If Nothing Has Worked: Contact a Trusted MacBook Repair Centre

This is an extensive guide listing some of the ways users can solve the MacBook overheating problems on their own. However, it isn’t necessary that it will solve the MacBook heating issue for every user. If you are still facing a heating issue in your MacBook, you should contact a reliable MacBook repair centre around you.

If you don’t have a repair centre nearby, you can contact Rapid Repair. They have tied-up with delivery partners to pick-up the damaged device from your home, fix it, and deliver it to your doorstep. Their team of expert super-techies are experienced in working with MacBook Air and Pro overheating issues and will fix the device properly to make it work like new. To get your Mac overheating problem resolved, contact us now.

MacBook Pro Touch Bar Disappeared

The MacBook Pro Touch Bar was a sensation when it was first introduced. It was an interactive digital strip that sat on top of the keyboard and provided functions based on the app or software a person is using. While it turned heads and increased the productivity of users, the touch bar isn’t immune to issues of its own.

A lot of users have reported issues with their Touch Bar ever since they updated their operating system to macOS Big Sur. If your Touch Bar suddenly seems to be behaving weird and unresponsive or freezing too often, and you’re trying to find something on “MacBook Pro Touch Bar disappeared”, then this article might have some answers for you. But before looking for solutions on how to turn on Touch Bar on MacBook Pro, let’s take a look at why your MacBook Pro Touch Bar is not turning on.

Why MacBook Pro Touch Bar Disappeared?

There can be several reasons why the MacBook Touch Bar is disappeared or why the Touch Bar is not showing up for some apps. Some of the common reasons are:

  • Application malfunction
  • Memory, CPU, and storage are being used heavily
  • Software glitches
  • Hardware issues
  • Water damage
  • macOS not updated

Some of these issues can be fixed at home while for reasons like hardware or water damage, you might want to contact a professional.

How to Fix MacBook Pro Touch Bar Missing?

One of the biggest reasons for the Touch Bar off on your MacBook Pro is the presence of older software. Update your system to the latest OS version as soon as it is available to see if the issue has been fixed.

Reboot your MacBook

Restarting your MacBook should be the first step you do no matter what issue you are facing with the laptop. Minor issues can occur due to bugs or software glitches that can be solved simply by restarting the device.

You can restart the laptop by heading to the Apple menu or holding down the command button while pressing the power button. Do note that this process will trigger a force restart that can cause you to lose unsaved changes. So process with caution.

Refresh the Touch Bar

You can refresh the Touch Bar through the activity monitor. The activity monitor shows all the processes currently running on your system. You can access it by going to the Utilities tab in the Applications menu. Open the Activity Monitor, search for “Touch Bar Agent” and then Force Quit the process to refresh it.

Refresh the Control Strip

Sometimes it can happen that the MacBook Pro Touch Bar options have disappeared from the control strip. You can refresh the whole control strip to see if its fixes the issue and the options appear again. Open the Terminal app and type the command “killall ControlStrip” without the quotes and hit Return. The touch bar should be visible now.

Reset the Touch Bar on MacBook Pro

Resetting the Touch Bar is a simple process but can fix the disappearing issue quickly. All you have to do is open Terminal and run the commands “sudo pkill TouchBarServer;” and “sudo killall “ControlStrip”;” without the quotes. It might ask you for the system password but after entering it, the service should restart and the Touch Bar would appear once again.

Reset the SMC of your MacBook Pro

Resetting the SMC is needed only if you have an Intel model. Follow these steps to reset the SMC:

  1. Turn off the Mac.
  2. Press and hold the Option + Control + Shift keys for a few seconds. The device might turn on at this stage.
  3. Keep holding the keys while pressing the Power button simultaneously. This would turn off your laptop if it turned back on.
  4. Hold the four buttons for roughly 7 seconds and then release them.
  5. The SMC is now reset. You can now Turn On the Mac to see if the issue is fixed.

Finally, Contact a MacBook Repair Centre

If none of the fixes stated above work for you, it is best to seek professional help. Remember that hardware issues and water damage can also cause the MacBook Pro Touch Bar to disappear. In such circumstances, you should take the laptop to the nearest Authorized Apple Service Centre or contact a trusted Macbook repair centre like Rapid Repair.

Rapid Repair uses only genuine spare parts to repair your devices and specialises in the repair of Apple devices like MacBooks, iPads, iPhones and iWatches. Our team of highly-experienced and trained technicians use state-of-the-art gadgets and the latest repair protocols to fix your devices. Contact us for reliable, absolutely hassle-free and convenient (we offer doorstep pick and delivery across India including Mumbai, Pune, Bangalore, Hyderabad, Chennai and others. and affordable repair services.

How to Protect and Fix a Water Damaged MacBook

Spilled water on your MacBook? Fret not, as you are not the only one who likes to sip on something while working on their device. Water damage in a MacBook is a more common occurrence than you might think. There are a lot of people around the world who face this issue and successfully fix their devices without spending hundreds of dollars for new parts. In this article, we will take a look at some of the tips and tricks on how to fix a water damaged MacBook unless it’s so severe that you have to consult experts.

While there are ways to revive your MacBook Pro with water damage that won’t turn on, it is best to prevent this from happening in the first place. There are several precautions that you can take to prevent water spills from damaging your precious laptop.

Cover your drink: This is probably the easiest of precautions. If you want to indulge in a beverage while working, just cover the drink with a lid. This way, even if the drink tumbles, nothing will spill out.

Keep your distance: Small things like keeping water sources slightly away from your Mac can be a huge lifesaver. Water takes some time to spread completely on a flat surface and if you don’t have a drink right next to your laptop then a little distance will give you some time to grab the laptop and put it in a safe location. Even keeping your laptop over a few books or magazines gives it the much-needed vertical space for protection.

Use protective gears: Keyboard covers, silicon lids for ports, screen guards and a laptop sleeve can come in very handy to stop the spread of water even if you somehow end up spilling it over your laptop. These protectors keep every opening closed for water entry and can prevent an expensive MacBook Air water damage repair.

Water Damaged MacBook: What to do?

For starters, here are the three important things you should do immediately when trying to salvage a water damaged MacBook Pro, MacBook Air or for that matter any MacBook model.

Unplug All the Peripherals Connected to Your MacBook

The first thing you should do to safeguard your MacBook against water damage is to unplug the power adapter, if that is connected. Be extra cautious while doing this; preferably put on rubber gloves and rubber footwear. Electricity and water aren’t the best of friends!

Besides, unplug all the dongles/peripherals like the mouse, scanner or printer connected to the device. It should be done to prevent the damage from spreading to crucial components including circuit boards, connectors, and battery.

Note:

  • If you have older MacBook models like 2009 MacBook Pro 15”, you can remove its battery. While the process of removing the battery on older Mac notebooks may seem straightforward, it must be done with care. So, do not fail to take the help of experts, if you need assistance.
  • Do note that the newer MacBook models like 2015 MacBook Pro 15″ have batteries that are glued inside the framework. Therefore, you can’t remove the batteries on the newer models of the Mac notebooks yourself.

Shut Down the MacBook and Leave It for a minimum of 48 hours

Another thing you should do without any delay is to shut down the MacBook (if it’s not already turned off) and leave it for at least 48 hours. Yes, it’s strictly recommended by experts, so make sure not to turn on the device before it has clocked the recommended time.

Just in case your MacBook is not responding, press and hold the power button at least five seconds until the notebook shuts down.

If the notebook is not shutting down by holding the power button, then your keyboard might already be damaged and is unable to send the “Force Shutdown” command on a software-level to the logic board of your MacBook. In this case, you need to shut down the laptop by another method.

Use tissues or a paper towel to soak any water still present on the keyboard surface, touchpad as well as the screen. Close the lid now to activate the hardware-level sleep sensor. This sends a signal from the logic board to disconnect power to the screen SSD drive, CPU and other supporting circuits. It stays in a shallow sleep mode for some time and then transcends into the deep sleep mode if the lid is closed for a significant amount of time. In deep sleep, all power to the memory chips is disconnected, thereby protecting the RAM, CPU, SSD drive and screen of your laptop.

Place Your MacBook (Non-Retina Model) into a Tent Position to Drain the Water

After shutting down the MacBook, flip your notebook into a tent position to drain the water. But wait a minute before flipping your laptop into the tent position!

Bear in mind that the tent method works only on the pre-2018 MacBook Air or a Pre-2013 MacBook Pro with a non-retina screen. These notebooks feature watertight screens, thanks to the front aluminium frame (available on the MacBook Air) or a front protective glass (available on MacBook Pro with a non-retina screen). Therefore, they are equipped to prevent water from entering inside.

However, to make the laptops thinner and lighter, Apple removed the protective glass and aluminium frame from their newer MacBook models containing retina display. These laptops aren’t as water-resistant as the previous generations due to the lack of protective layering inside. So, do not place your MacBook with retina display in a tent position, as it will help the water to sneak inside – causing damage to the screen.

To help MacBook models with retina display to drain water safely, keep them in a 90-degree position against a table edge very carefully and let them dry out. Keep a paper towel underneath the MacBook’s screen to protect it from scratches, prevent it from falling over, and soak any water dripping from the screen.

Image credit: Mac Tech Easier

Things You Shouldn’t Do When Dealing with Liquid/Water Damaged MacBook

There are three important things you must not do with a liquid-damaged MacBook.

Don’t Try to Dry your MacBook Using a Hairdryer

Using a hairdryer to dry a wet MacBook is an absolute no-no. So, you must avoid doing it as it can cause more damage to the device, helping the liquid to sneak into the innards.

Don’t Shake the Wet MacBook

Shaking a wet MacBook is a blunder as it will help the water to get inside even those parts where it wouldn’t go normally. If the water is already present in the hinge section, shaking it can cause the water to spread into more delicate components such as the CPU, BGA balls, or the backlight film of the screen, causing more damage than before. Hence, make sure not to shake it.

Don’t Try to Turn on the Device

Another important thing worth keeping in mind is to avoid turning the device on as it can further jeopardize components like circuit boards and battery. Keep the lid closed for as long as you can to give your MacBook the best chance to dry out completely.

What About Using Rice to Dry the MacBook?

This guide would be incomplete without the mention of the rice trick. According to this popular legend, users can put a wet MacBook inside a bagful of uncooked rice to dry it out. While this old-fashioned trick might partially work on a liquid damaged iPhone, chances of it working on a MacBook is quite slim. So, we wouldn’t suggest it.

Do note that the rice or its tiny particles may get inside the ports of the notebook, which could cause additional damage. Therefore, avoid doing it.

Contact a Trusted MacBook Repair Center, If Basic Tricks Don’t Work

All the tips, tricks, hacks and workarounds mentioned above are basic in nature when it comes to treating MacBook water damage. So, if all the above tricks fail, then it is highly likely that the hardware of your MacBook has been damaged and would require professional help for any repair or replacement.

Contacting a reliable and well-known MacBook repair centre is the safest bet for MacBook water damage repair in that case. Rapid Repair, with its team of supertechies and years of experience in treating damaged or faulty Apple devices, can fix your water damaged MacBook Air or Pro at a cost-effective price.

MacBook Pro Dead and Not Turning on? Quick and Easy Fixes

Nothing can be more terrible than finding your MacBook Pro dead or being stuck with a black screen and on occasions like those you’re wondering why your MacBook Pro is not powering on? While Apple’s notebook excels in delivering top-notch performance, it also has a history of being embroiled in stubborn issues. But fret not; this is where our pro tips come in handy. Whether your MacBook Pro refuses to turn on or seems to get stuck at the Apple logo, these viable solutions can help you in fixing your ill-functioning device.

So, What Could Be the Reason Behind the Issue?

Well, if your MacBook Pro would not turn on, then it could be due to more than one reason. For instance, it could be due to a faulty charging cable, a damaged power adapter or a software or hardware problem with the device. Some reasons might be very similar to what might be the case for a MacBook Air not starting but a few may be specific to the MacBook Pro not powering on.

There can be several issues that could be preventing your MacBook Pro from starting up normally. Let us take a look at the possibilities and see how you can resolve them easily.

Read – Mac Won’t Update: 7 Best Tips to Fix macOS Update Issues

Check the Power Supply

First thing first, check your MacBook Pro’s charging cable and adapter. Make sure that the Magsafe charger is fitting properly in the jack and is not loose. Also, ensure that the cable is not damaged. A faulty cable can not only cause issues with charging but can also damage the charging port, and even the battery in some cases.

Apart from the charging cable, double-check the adapter and make sure it is not getting too hot while charging. If possible, try to use a different power adapter and cable to charge your dead MacBook Pro and see if it is taking charge and if it boots up.

If using a new or a different power adapter does not help then there is a strong chance of the problem being at the other end of the connection and not with the cable. A faulty DC/Charging Jack or a service battery might be preventing your device from starting up. In this case, it is best to contact a reliable MacBook repair service centre to help you with diagnosing and fixing the issue accurately.

Reset the SMC

Resetting the SMC (System Management Controller) can often fix certain issues related to battery, power, fan and some other features too. So, if you are still unable to turn on your MacBook Pro or your Apple notebook appears to have gotten frozen at the Apple logo, it would be apt to give this solution a try.

To get going, plug in the power cable and then press the Shift + Ctrl + Option/Alt keys and the power button simultaneously and hold them for at least 10-12 seconds. Next, release all the keys and then press the power button to try and restart your MacBook. If there was a minor issue with power or battery which was preventing your device from booting up, that should get resolved and the MacBook should start up successfully.

Important:

  • Please note, M1-powered MacBooks do not come with SMC. It means you do not need to bother about resetting SMC on your M1MacBook Pro.

Reset the PRAM / NVRAM

Another reliable solution for fixing a dead MacBook Pro or solving the ‘MacBook Pro Won’t Turn On’  issue is resetting the PRAM/NVRAM. For those unfamiliar with the terms, NVRAM (Non-volatile Random-Access Memory) and PRAM (Parameter RAM) are the areas in the memory of the device that store data such as volume settings, startup disk selection, screen resolution and even kernel panic information. Resetting them often fixes several minor issues which may be preventing your device from starting up.

To get going, hold down Command, Option (Alt), P, and R, keys at once and turn on the device. Make sure to hold down the keys until the MacBook restarts again. Better still, let it restart twice. Then, release the keys at once. Now, your MacBook should restart normally if the issue was with the NVRAM/PRAM.

Important:

  • Though the M1-powered MacBook Pro does come with NVRAM, it works a bit differently on the device. Notably, Apple’s M1-equipped MacBooks feature parameter memory where you can view and customise settings with the terminal command NVRAM. However, they don’t allow resetting NVRAM.

(Credit: Apple Support)

Run Disk Utility in Recovery Mode

If your MacBook is not completely dead but has been stuck with a white, blue or grey screen then you can try the below step to run the Disk Utility to fix any issues with your disk drive, which could be preventing it from booting up properly.

  1. To get started, hold down the Command and R keys at once. Make sure to hold down the Cmd + R keys while your notebook is booting up.
  2. When your MacBook starts in Recovery Mode, you will have access to Utilities. Now, click on the Disk Utility and find the notebook’s drive (Macintosh HD) and select it.
  3. Next, click on First Aid. Now, Disk Utility will track down the errors with your disk. Once it has found the errors, it will ask for your permission to repair them.

Image credit: Apple Support

In the Recovery Mode, you can also restore your MacBook from a Time Machine backup or install/reinstall macOS. Once you have restored your MacBook from the latest backup, the issue should be behind you.

Check for Updates

Make sure your MacBook Pro is running the latest version of macOS. Go to the Apple menu > System Preferences > Software Update to check for and install any available updates. Connecting to a power source and keeping your MacBook Pro on charge for 15 minutes or more may help and you must try that before proceeding for a final repair solution.

Disconnect External Devices

If you have any external devices connected to your MacBook Pro, such as USB drives, printers, or external displays, disconnect them and try turning on your MacBook Pro again. There have been instances where it was noted that a MacBook is not starting when connected to a particular device, which was causing the problem.

Contact MacBook Repair Centre

Hopefully, you were successful in fixing your MacBook Pro which was not turning on or was facing the dead issue. Since the above-mentioned methods have helped many users, we expect them to work for you as well.

However, if your device is still not fixed despite trying the above-mentioned tricks, then there are high chances of some issue with the motherboard that needs Level 4 repair, which of course cannot be done by you at home.

In such a case, contact a MacBook repair centre. Having offered top-notch yet cost-effective service for several years, Rapid Repair is one of the most trusted MacBook repair centres in India. Contact us at the earliest to help you bring your MacBook Pro back to life.

You can also contact the best repairs in town for all problems related to a MacBook not starting or anything specific technical or physical issue with your MacBook Air or MacBook Pro. The top repair experts arrange for easy doorstep pickup and drop services and are a reliable means to get your iPad, MacBook, iPhone, and Apple Watch fixed. Get in touch with them today wherever you are in India. Serving to 33+ pin codes and expanding every day.

Apple MacBook Air: Pros And Cons You Need To Know

Pros and Cons of MacBook Air

MacBook Air has been one of the thinnest and lightest laptops from Apple. The series got introduced in 2018 and overtook the market share of 11 inch MacBook Air which was launched in 2016. MacBook Air is available in three different shades- silver, gold, and space grey. MacBook Air is claimed to be the greenest MacBook ever as it is made up of 100 percent recycled Aluminium.

Apple owners boast, having a brilliant retina display, all-day battery life, force touch trackpad, touch ID and latest-generation keyboard. Now here lies the issue. The iconic laptop has got several complaints with the keyboard. The MacBook keyboard issues have been officially accepted by Apple. The butterfly keyboard of MacBook has been a problematic issue since its arrival. As per various reports and complaints, the butterfly switch keyboards aren’t properly fixed. The space bars enter with two spaces while clicking and this is happening with both MacBook Air and MacBook Pro.

Coming to the sales point of view, MacBook Air has been one of the highest selling laptop due to its lightweight feature. The iconic design and extremely lightweight body have made it a big hit amongst all youngsters and corporate people. The hardware specifications are extremely suitable for both professionals and students. MacBook Air in India comes with a high price tag. So before you buy you need to consider the pros and cons of MacBook Air.

Pros of MacBook Air

MacBook Air is Environment-Friendly and Recyclable

As per the latest model of 2018, MacBook Air is a fully green complaint, so if you all are nature conscious and want to contribute to nature, then you must opt for this laptop. The iconic laptop has a thin edge as it is designed from 100 percent recycled aluminum. The “feel good factor” of contributing to nature will be always there with you!

Brilliant Retina Display

The impressive display has a high resolution of 2560X1600 with 4 million pixels which results in a sharp and eye-pleasing display and is simply jaw-dropping. It has forty-eight percent more colors than the previous model. The razor-sharp text clarity is really praiseworthy. The display has fifty percent thinner borders and it gives an excellent display experience.

Latest-Generation Keyboard with a Force Touch Trackpad

Though there are few complaints about MacBook keyboard issues still there are many who loves it. The unique touch bar allows you more space for the other keys. Though the new layout may take time to get used to, it is really appreciated as the keys are not loud.

Now there is a little twist, which may again be considered as a con by some people. The new MacBook Air does not have touch sensitivity display; instead, they have provided an increased model of the trackpad with 4.7” X 3” which has made this device very user-friendly.

Security via Touch ID

The new MacBook Air 2018 has an incredible Touch ID feature. There is a small sensor that turns your fingerprint into a password. Here Touch ID is not only used to unlock your MacBook Air but it is also used to protect your documents and other settings in your computer. Even people who are doing online shopping through Apple Pay can use this fingerprint sensor to confirm the payment.

The Lighter Model

The new MacBook Air is extremely lightweight and weighs just 1.25 kgs, which is the same as three iPhones! It’s highly portable.

Great Battery Life

It’s a powerhouse and has great battery life. Among all the series of MacBook Air, the 2018 model has the most durable battery. It provides 12-13 hours of battery backup.

Better Sound Than Any Other MacBook

The latest MacBook Air has 2x more bass which provides a fuller sound with a greater range which results in 25 % more volume than the last model.

The Elegant Look

The sleek look of the new MacBook Air which is just 15.6 mm thin, has been a great companion for business personalities. The latest redesigned keyboard creates an exceptional feature which makes the MacBook Air to stand above its competition.

Loaded with Necessary Applications

The new MacBook Air comes with some inbuilt necessary apps such as Safari, page numbers, Keynote, Calendar, Maps, video editing app iMovie, music production app- GarageBand, Facetime for text and video messaging, Mail and Message.

The other unique features that MacBook Air has are:

  • Thunderbolt 3- Universal port for charging, storage, data transfer, connecting other device and display
  • I5- Eighth-generation Intel Core i5 processor
  • 802.11ac Wi-Fi and Bluetooth 4.2
  • Default memory is 8GB and Storage is 128GB which can be expanded to 256GB via PCIe-based SSD
  • Apple T2 Security Chip- It’s the second generation customized Mac silicon designed by Apple which makes the MacBook Air more secure.
  • FaceTime HD camera for various one to one and group calls
  • Three microphones to captures the voice more accurately

Now that we have listed out the pros of MacBook Air, we left out with the cons of the same on our list of pros and cons of MacBook Air.

Cons of MacBook Air

The cons of MacBook Air are completely based on the feedback of Apple users.

Slow Performance

The slow performance has been one of the biggest drawbacks of the MacBook Air. It has been counted as below average when it comes to speed performance. Even several low priced computers have better speed than MacBook Air. Though it is said that the MacBook Air has been designed for casual computing and not for intensive tasks, still it can handle most average tasks easily and smoothly.

High Priced

MacBook Air has been launched with some extra unique features and extra features mean higher price. The newest model starts at a cost of Rs. 1,14,900. For a 13-inch Non-Retina display, MacBook Air costs 84,900. And globally the price of complete series of MacBook Air got increased to $1199 due to its increased demand.

Limited Storage Capacity

Despite of higher cost, there is not enough storage capacity. The base model comes with only 128 GB SSD. If you are a photographer, or you have to store a lot of videos then the space will not be enough for you. But here is the twist, people who use Cloud to store their files, for them, Apple MacBook Air can be a good choice. And still, if you need some extra space you have to opt for an external hard drive.

Limited Hardware Upgrade

The hardware upgradeability is limited in the new MacBook Air 2018 model. The memory and the components of the processor are soldered within a single circuit. There is a scope of customization before purchase, but later on, there is no room for memory, processor and storage upgrades.

Conclusion

Our conclusion after weighing all the pros and cons of MacBook Air is that the latest Model is a worthy buy for all college goers and professionals, those who look for a sleek model with better visibility. It is not for rigorous users who require larger data and processing capacity. There are many unique features that MacBook Air 2018 has come up with for their fans. The price of Apple series is always higher in comparison to all other brands available in the market but has a huge brand value so people who love Apple and have a craze for the brand can definitely go for this.

Still, there can be several issues that can be faced by you while using your MacBook Air, in which case you can contact the nearest authorized service center. Here is what all should be considered before hiring a MacBook repair expert:

  • You should be well aware of the reputation and feedback of the service center.
  • You should get to know what all services do they provide.
  • Make sure that the staff and technicians are experienced and have in-depth knowledge about the product.

All Apple MacBook series are extremely delicate and sophisticated, though it has a great shelf life, still, users face several issues at times, and to get those issues sorted, you need a reliable and experienced service provider, and Rapid Repair is one of the most well-known service centers for MacBook repair in Delhi NCR.

Now if you are facing a MacBook keyboard issue, or if there is any difficulty in using MacBook Air, Rapid Repair is one of the best problem solvers and can do excellent MacBook air repair in Delhi NCR.

What Rapid Repair assures:

  • As the name suggests, a rapid service
  • Reliable and reasonable price
  • Authentic parts exchange
  • Quick and prompt service
  • Doorstep pickup and delivery service

So, before you choose the service center to get your MacBook Repair in Delhi makes sure you choose a reputed service center. Rapid Repair is a 3rd party independent service provider for all your high valued products such as MacBook and other Apple products such as the iPhone.Are you facing any MacBook issue? Don’t worry, contact us now, our representative will be there to help you.

whatsapp logo